- Building a homelab requirements
- Creating a Amazon Account
- Securing your AWS Account
- Build a Homelab VPC with a Single Public Subnet
- Securing access to your vpc homelab in AWS
- Building a windows server for your homelab
- Assign Elastic IP to Instance
- Connecting to your EC2 Homelab Server
- Continue to grow your homelab using AWS
Looking to start a career in IT? There may come a time when you will want to study for certain certifications or just learn new technologies. Building a Homelab will come into the picture as you start to grow in your field in IT. Its the best way to get your hands dirty withougt testing on your work productions network.
Before the days of the cloud providers like AWS, Azure, Google and others, you had to go out and buy a powerful computer or server if you wanted to construct a home lab for practicing with technology. This guide can be for even users looking to just tinker around.
Excessive heat, licensing concerns, limited resources, and other drawbacks of purchasing a powerful computer or server are only a few of the drawbacks. With the rise of cloud computing and its lower cost, you now have the option of deploying your home lab in the cloud, giving you more flexibility. Although there are other cloud possibilities, we’ll concentrate on Amazon Web Services in this blog and video (AWS).
Building a homelab requirements
Depending on your technical expertise and what you are looking to learn, there are not any one set particular requirements needed for a homelab. AWS has many different types of technologies that you can utilize to building your skillset such as using:
- Amazon EC2 instance to build windows server
- Building out separate VPC environments to test keep environments or certain application separate
- Testing Different Vendor Products using its marketplace
- Building storage buckets using Amazon S3 to store personal files in them
- And using Router 53 for your DNS needs.
These particular options will only touch the tip of the iceberg on what you can do. In this blog we will detail the below steps to build a fully functional homelab in aws.
AWS Homelab Steps
- Setup AWS IAM user with MFA
- Build a VPC with a Single Public Subnet
- Create a Security Group that allows either rdp or ssh from your home IP
- Then Build a Microsoft Windows Server 2019 server
- Show how to access your server through rdp or ssh
Creating a Amazon Account
First you want to setup a Amazon Web Service Account here. You will go through a five step process to setting up your account. AWS has a multitude of free service tiers you can use forever and for up to 12 months. These options give you the ability to not only test out the power of the cloud but also progress your IT career.
Securing your AWS Account
When creating an aws account you will logged into your account with the root user account. In a production work environment, this may not be the most secure option. AWS recommends using the least privilege access methodology which means you only give the least amount of power for accounts based on their job.
To secure our root account we will turn on multi-factor authentication and use that to complete setting up the homelab using aws. First you want to go the IAM service in aws account. You can search for it at the very top or click here. On your dashboard you should be prompted with:
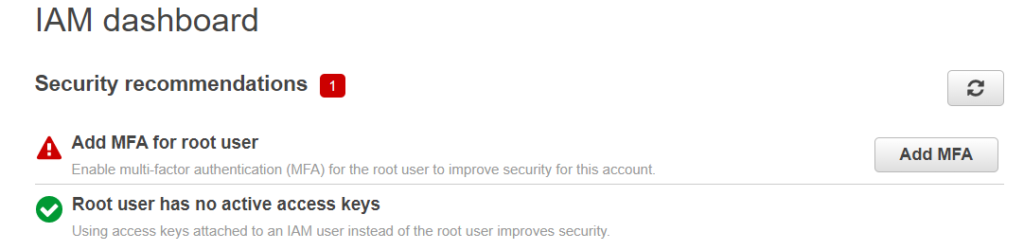
- Select Add MFA
- Activate MFA
- Virtual MFA Device: This can be your authenticator application of choice such as google, microsoft, duo, etc…
- Show QR Code and then put the codes in the fields below and Assign MFA
Now every time you sign in with that account you will be prompted to use those codes along with your password.
Build a Homelab VPC with a Single Public Subnet
Every AWS account comes with a default VPC in every region already created to allow you to get right into using their services without knowing much. Knowing how to create a VPC for your Homelab will give you the ability to separate environments for certain task and remove those environments without affecting others.
Each VPC at a minimum requires a VPC with a cidr block, Subnets to be used within that cidr block, route tables and an internet gateway. As you become experience it will be fun to create those manually or using automation but for this lab we will use the wizard.
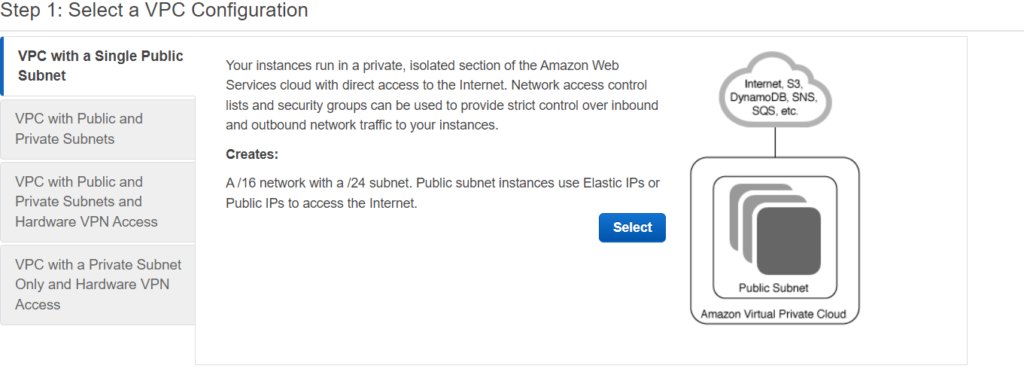
Search for VPC in the services search bar and select Launch VPC Wizard. You will be presented with the following options. Select the first option and and click select.
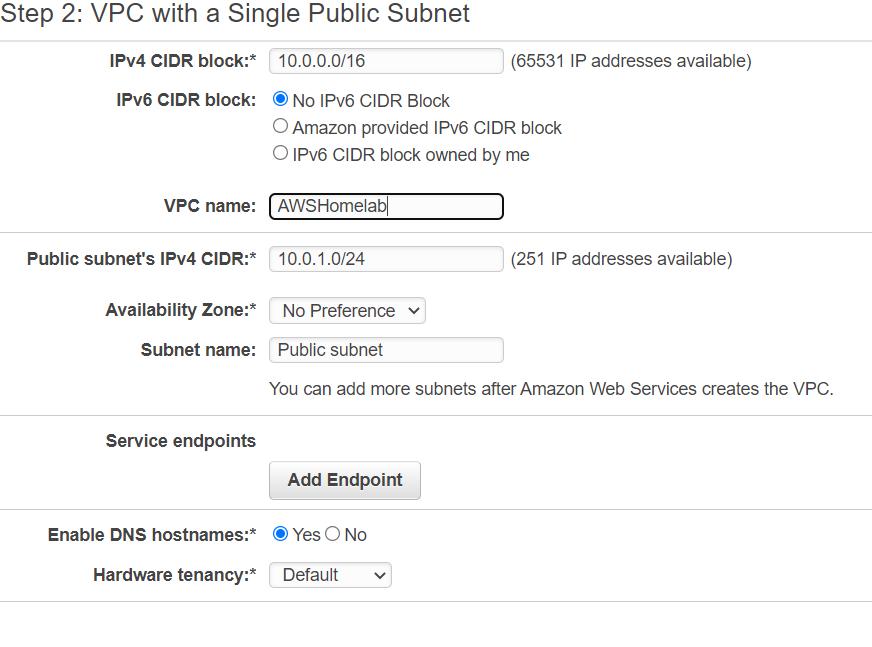
Next you want to define your subnet for your aws homelab. The IPv4 CIDR block is the allowed block range for your entire VPC. The subnet cidr is the range that will be used for resources within your VPC.
Since we are only using one subnet the Availability Zone it sits in will not really matter. Once all of your settings are correct click Create VPC. Back on your VPC dashboard you will then have a new vpc created, new subnets, new route tables and a new internet gateway. Once you become comfortable with a setup like this you can move onto a different preferred method here.
Securing access to your vpc homelab in AWS
Once your vpc is create you will need some way to access the resources you will be creating. To be able to access Windows or Linux servers, we will need the ability to RDP or SSH into our environment. We can create security groups to specify who and what kind of traffic can access our environment.
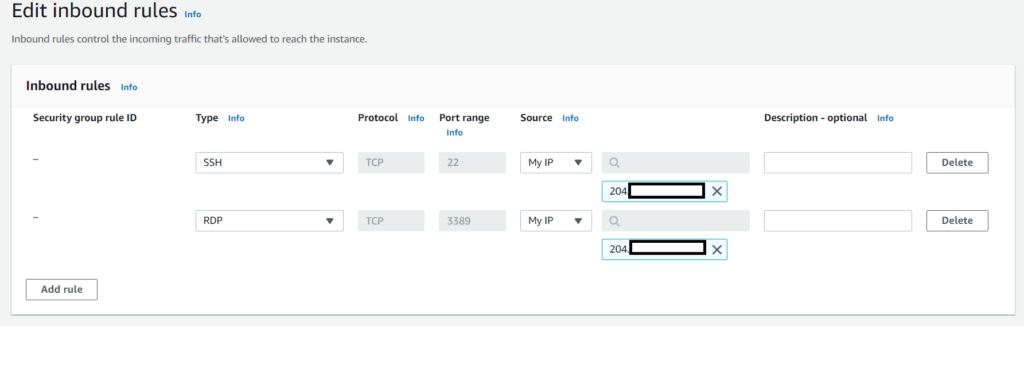
When you create a vpc, it will create a default security group that allows all access to your homelab environment. To limit the scope of that on the vpc dashboard you will see an option called security groups. Click and select the default security group that resides with your VPC.
Edit the inbound security group and remove the default rule. Create two new rules specifying RDP and SSH allowed choosing the source as “My IP”. This will then only allow access to your servers via RDP or SSH to provision them for what you need.
As you start to develop certain applications you may want to open up access to other ports which can be done inside the same or different security group.
Building a windows server for your homelab
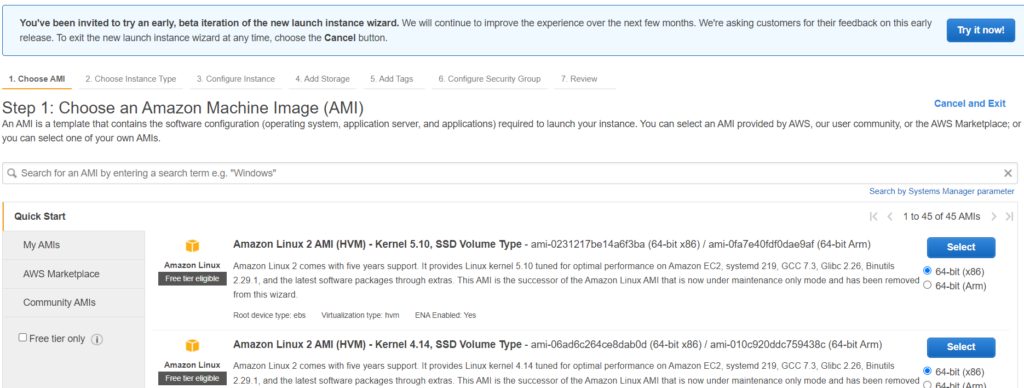
Building a windows server for you homelab using aws can be really simple. Lets setup one windows instance associate it with our security group we edited. In the AWS services search bar search for EC2. Click on Instances and select Launch Instance.
The same options apply if you building a windows or linux server.
- First scroll and select the Amazon Windows Server AMI.
- Then choose the t2.micro image. The instance types may change but it should say free tier eligible.
- Under the instance details change the Network to our newly created VPC and leave everything else default
- Keep the storage the same but more can be added depending on your project needs
- Tags can be assigned to resources to better keep track of services across AWS
- Then select the security group that we edited to allow ssh and rdp
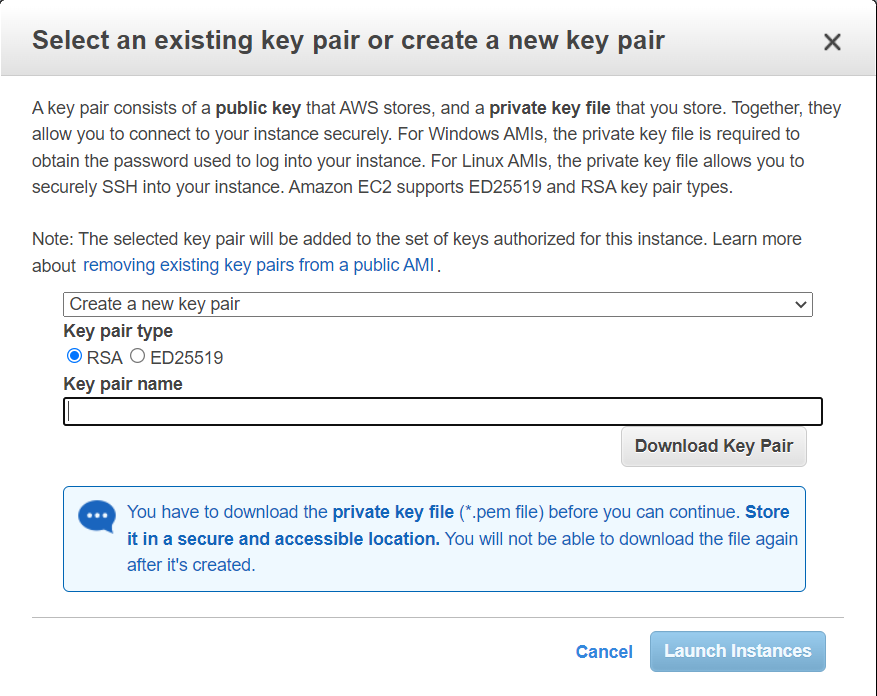
- When you get to the last screen you will need to create a new key pair that you will need to keep in order to login to your instance
Assign Elastic IP to Instance
To gain access to your server from the internet you need a public internet accessible IP address. The subnets you created during your vpc creation are private network addresses that cannot be accessed from the internet.
On the EC2 services under network security select Elastic IP. Click Associate Elastic IP address and assign it to your running windows instance.

Connecting to your EC2 Homelab Server
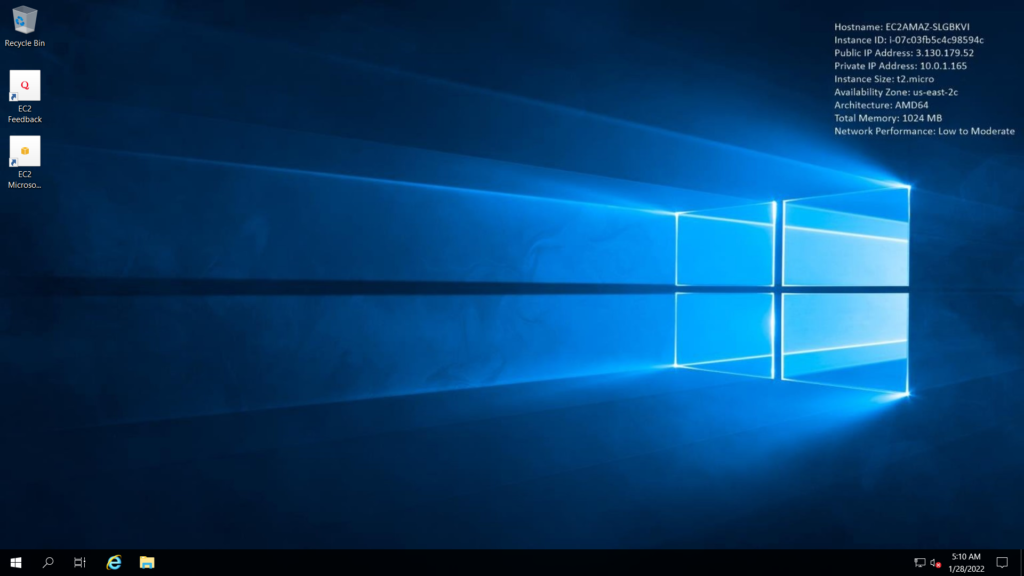
Take the keypair you created and go to the instances tab and select your new instance and connect.

Choose the RDP client tab and download the remote desktop file. Use the key file to get the password for the instance. Click on the RDP file and enter your username and password.
Continue to grow your homelab using AWS
Don’t stop at were we left off here. You now have a fully functional way to build a homelab without spending money on physical gear. When configuring other host within your VPC environment you do not have to assign each host an Elastic IP. This now allows you to access the other host using its private ip address range you setup.
Explore creating S3 buckets, Active Directory Domains, Load Balancers with Target Groups or maybe even connecting the environment down to your local network at home. The list of possibilities are endless when working with the cloud.
When you are done utilizing your network for home use or testing you can delete all of your running instances, network interfaces, and the VPC if you no longer need it.
Once the Windows/Linux Server has been created (within AWS), AD/LDAP installed & configured (on the server), and making sure that the server has been correctly/securely promoted to a Domain Controller (DC); is it possible to create VMs on a local computer & then connect those VMs to the DC/Server (within AWS)?
The reason for asking? Because typically to create a similar virtual home-lab would require having enough hardware resources (ram & hdd storage) to create a server & client machine within the hypervisor (VMware, Virtualbox, KVM/Qemu, UTM Mac – etc.).
Essentially, is it possible to replicate such a lab environment, but with the main server hosted in the cloud (AWS/Azure/GCP)?
yes so you could connect vms that sit on your local network to aws but you would either have to 1. open up ports to the outside to connect to the required servers which but restrict the source coming from your home IP. 2. Connect to your aws vpc using some type of vpn like open vpn which i did do an article on that here. But essentially you could also just build all of your machines in aws and keep them small and shut them down when not being used to reduce cost if its just a homelab/learning environment. But if your looking to utilize some of the services to be used for home applications then you’d want to look into some type of vpn solution to connect directly to your vpc unless your fine with just opening the port up and just restricting it to your home ip.
Great reply & response time, appreciate it! Option 1 is how I would typically create home-labs (years ago); in hindsight, clearly it’s not the best option. I realize now that implementing a VPN is more secure & best practice.
If choosing option 3 (build all machines in AWS), how does that work within the limits of “AWS Free Tier “?
The reason I’m asking? Because the included features with AWS free-tier are:
> 750 hours per month of Linux, RHEL, SLES, or Windows t2.micro or t3.micro instance dependent on region (12-Months)
> 30 GB of Amazon EBS: any combination of General Purpose (SSD) or Magnetic …. (etc.)
t2.micro (Windows) = 1 (vCPU), 1 GiB (Memory), EBS Only (Storage)
In order to create a server (DC) and client home-lab, wouldn’t there be a need for more storage space (etc.)? Checking the storage hardware requirements for Windows Server:
> Minimum: 32 GB, “…. this minimum should allow you to install Windows Server 2022 using the Server Core installation option, with the Web Services (IIS) server role. A server in Server Core mode is about 4 GB smaller than the same server using the Server with Desktop Experience installation option.” …. {Source: https://learn.microsoft.com/en-us/windows-server/get-started/hardware-requirements }
**Note: Again, this is simply for a practice-lab**
Essentially, when choosing option 3 (build all instances within AWS), after creating a Windows Server (DC), there would be a need for more EBS storage in order to create a Windows client-machine (to connect to the DC), correct?
Yea you could actually run all three using the free tier. Since it’s not a production network you could probably get away with going under the Microsoft recommended specs. I can typically run small servers for an entire month for probably less than $20 if I’m running them all month if this lab is shutdown when not needed, you may never hit the monthly limits for the free tiers.