BGP is an interdomain routing protocol that is intended to provide businesses with loop-free routing. In this lab we will go over the cisco router bgp configuration steps. This lab consists of a simple 3 router configuration using eve-ng. If you have never configured a cisco router bgp configuration before then this lab is for you.
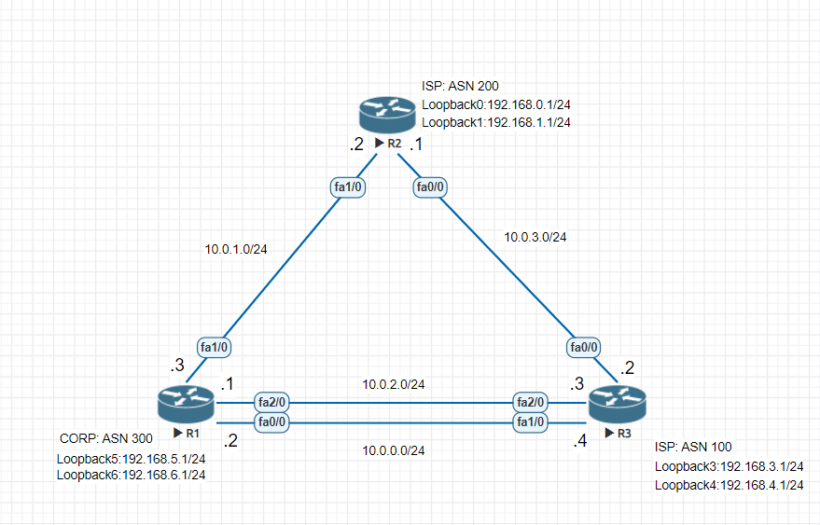
Depending on your router IOS version or type, you may have slightly different commands available. Follow along with this lab by using the address table below.
| Device Name | Interface | Ip4 Address |
|---|---|---|
| R1 | fa0/0 | 10.0.0.2/24 |
| R1 | fa1/0 | 10.0.1.3/24 |
| R1 | fa2/0 | 10.0.2.1/24 |
| R1 | Loopback5 | 192.168.5.1/24 |
| R1 | Loopback6 | 192.168.6.1/24 |
| R2 | fa0/0 | 10.0.3.1/24 |
| R2 | fa1/0 | 10.0.1.2/24 |
| R2 | Loopback0 | 192.168.0.1/24 |
| R2 | Loopback1 | 192.168.1.1/24 |
| R3 | fa0/0 | 10.0.3.2/24 |
| R3 | fa1/0 | 10.0.0.4/24 |
| R3 | fa2/0 | 10.0.2.3/24 |
| R3 | Loopback3 | 192.168.3.1/24 |
| R3 | Loopback4 | 192.168.4.1/24 |
We will use the loopback addresses to simulate the external networks for the isp and the internal networks for the Corp Network.
Initial Lab Cisco Router Configuration
We will console into each router and apply the below configuration on each device. The settings should be similar on each device besides the different ip addresses that will be applied.
R1 Configuration
R1#Conf t
R1(config)#interface loopback 5
R1(config-if)#ip address 192.168.5.1 255.255.255.0
R1(config-if)#interface loopback 6
R1(config-if)#ip address 192.168.6.1 255.255.255.0
R1(config-if)#interface fa 0/0
R1(config-if)#ip address 10.0.0.2 255.255.255.0
R1(config-if)#no shut
R1(config-if)#interface fa 2/0
R1(config-if)#ip address 10.0.2.1 255.255.255.0
R1(config-if)#no shut
R1(config-if)#interface fa 1/0
R1(config-if)#ip address 10.0.1.3 255.255.255.0
R1(config-if)#no shut
R1(config-if)#exit
R1(config)#exit
R1#copy run start
R2 Configuration
R2#Conf t
R2(config)#interface loopback 0
R2(config-if)#ip address 192.168.0.1 255.255.255.0
R2(config-if)#interface loopback 1
R2(config-if)#ip address 192.168.1.1 255.255.255.0
R2(config-if)#interface fa 1/0
R2(config-if)#ip address 10.0.1.2 255.255.255.0
R2(config-if)#no shut
R2(config-if)#interface fa 0/0
R2(config-if)#ip address 10.0.3.1 255.255.255.0
R2(config-if)#no shut
R2(config-if)#exit
R2(config)#exit
R2#copy run start
R3 Configuration
R3#Conf t
R3(config)#interface loopback 3
R3(config-if)#ip address 192.168.3.1 255.255.255.0
R3(config-if)#interface loopback 4
R3(config-if)#ip address 192.168.4.1 255.255.255.0
R3(config-if)#interface fa 0/0
R3(config-if)#ip address 10.0.3.2 255.255.255.0
R3(config-if)#no shut
R3(config-if)#interface fa 2/0
R3(config-if)#ip address 10.0.2.3 255.255.255.0
R3(config-if)#no shut
R3(config-if)#interface fa 1/0
R3(config-if)#ip address 10.0.0.4 255.255.255.0
R3(config-if)#no shut
R3(config-if)#exit
R3(config)#exit
R3#copy run start
Implementing Cisco Router BGP Configuration on all Routers
With all of the router devices configured we can now setup BGP neighbor relationships on R1. BGP works by taking what’s called an ASN number to uniquely identify each device on the internet to make sure that routing between routers is optimal.
IANA makes autonomous systems numbered one through 64511 available for global use. Private and reserved purposes are reserved for the 64512 to 65535 series. Autonomous Systems were created to regulate networking organizations such as ISPs, educational institutions, and government agencies.
Since this is a lab environment we are using whatever number we want since this will not connect to the real outside world.
On each router we are going to configure:
- The BGP ASN Number
- assign a router id to uniquely identify the router in the bgp configuration
- We will then configure all the designated neighbors which will be our 2 isp’s
- Then we will advertise the prefixes of the AS behind the routers.
R1 Cisco BGP Configuration
R1(config)#router bgp 300
R1(config-router)#bgp router-id 1.1.1.1
R1(config-router)#neighbor 10.0.2.3 remote-as 100
R1(config-router)#neighbor 10.0.0.4 remote-as 100
R1(config-router)#neighbor 10.0.1.2 remote-as 200
R1(config-router)#address-family ipv4 unicast
R1(config-router-af)#network 192.168.5.0 mask 255.255.255.0
R1(config-router-af)#network 192.168.6.0 mask 255.255.255.0
R2 Cisco BGP Configuration
R2(config)#router bgp 200
R2(config-router)#bgp router-id 2.2.2.2
R2(config-router)#neighbor 10.0.1.3 remote-as 300
*Jun  8 08:23:41.569: %BGP-5-ADJCHANGE: neighbor 10.0.1.3 Up2 remote-as 300
R2(config-router)#neighbor 10.0.3.2 remote-as 100
R2(config-router)#address-family ipv4 unicast
R2(config-router-af)#network 192.168.0.0 mask 255.255.255.0
R2(config-router-af)#network 192.168.1.0 mask 255.255.255.0
R2(config-router-af)#exit
R3 Cisco BGP Configuration
R3#conf t
R3(config)#router bgp 100
R3(config-router)#bgp router-id 3.3.3.3
R3(config-router)#neighbor 10.0.3.1 remote-as 200
*Jun  8 08:32:06.753: %BGP-5-ADJCHANGE: neighbor 10.0.3.1 Up .1
R3(config-router)#neighbor 10.0.2.1 remote-as 300
*Jun  8 08:32:29.717: %BGP-5-ADJCHANGE: neighbor 10.0.2.1 Up
R3(config-router)#neighbor 10.0.0.2 remote-as 300
R3(config-router)#address-family ipv4 unicast
R3(config-router-af)#network 192.168.3.0 mask 255.255.255.0
R3(config-router-af)#network 192.168.4.0 mask 255.255.255.0
R3(config-router)#exit
Now you may be wondering should i be advertising the Class C networks in the 192.168.0.0/16 range to the isp. Well if these ISP’s were connecting your other sites over an mpls connection then these would advertise the routes to those locations for you.
Now lets get into some verification of our current cisco router bgp configuration.
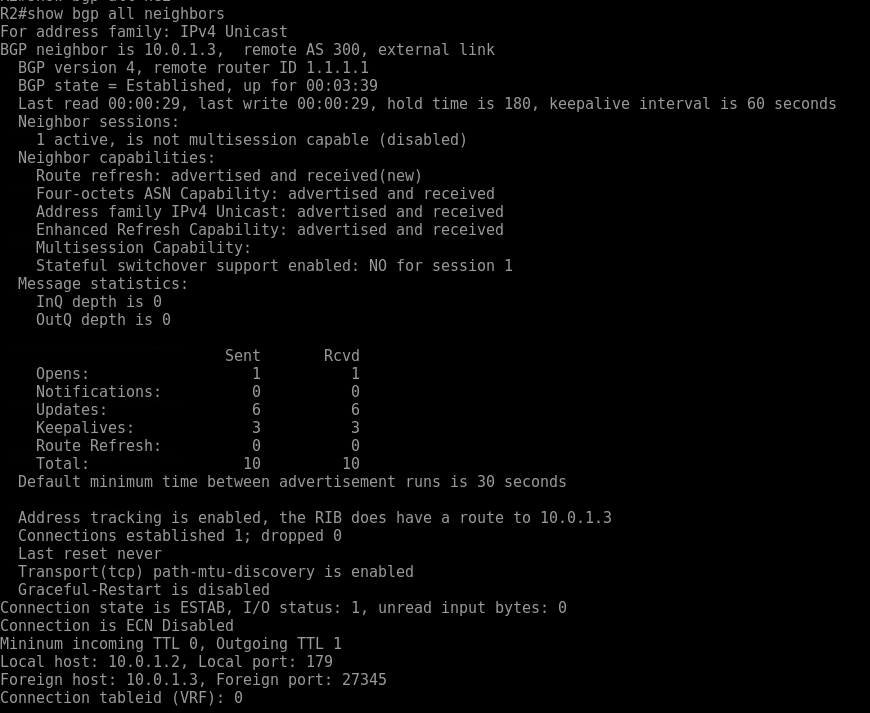
How to verify my cisco bgp configuration is working
Lets first look at one of the routers and run the following command “show bgp all neighbors”. We now see all the neighbor connections we are connected to from this router. You should see all of the remote router IDs of the neighbors. If your are missing any then that is when you should look over your bgp configuration again. Some of the important verification methods you should look for are:
- BGP state = Established
- remote router id should show the id of the remote AS
- The for address family should show either ipv4 or ipv6
- How often are the keepalives sent
- How long will the bgp session remain open if no keepalive messages are received.
To view a more condensed summary of the bgp activity you can issue the command “show bgp ipv4 unicast summary”

When troubleshooting bgp and looking for the next hop in the route “show bgp ipv4 unicast” will show which route is the best. BGP routes based on the least amount of hops it takes to get to your destination. In some cases this may not be optimal if you want to go over a fast link. There is a way to alter that which we will talk about in another lesson.
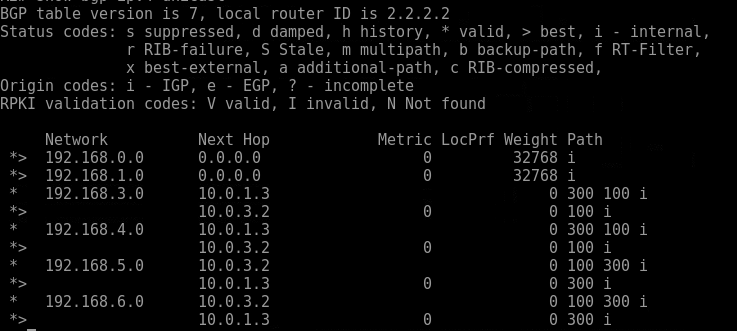
As you can see all networks with the > next it shows the best path. Looking at the left side under the Path section you can see that its less hops.
Conclusion
We walked through configuring an entire cisco router bgp configuration. This complete guide could easily be followed by a beginner to gain immediate knowledge of how bgp works to connect redundant isp’s to a corporate network and how to verify those routes are working. This is only the tip of the knowledge about BGP. You can follow more documentation on Cisco’s website.


thank you so much for this Labs. God bless u.
No problem. If you have questions or would like or have lab ideas let me know. Thanks
I can’t to show run bgp config
Are you trying to see the bgp configuration inside your running config. If so you can do a “show run | i bgp”, “show ip bgp”. If you need to further dig its best to use the ? behind your command to gather further arguments you can use.