Implementing Cisco HSRP Configuration in your network will provide a fault-tolerant default gateway for your network. Hot Standby Routing Protocol (HSRP) is a Cisco proprietary redundancy protocol that provides users at the access layer uninterrupted access to the network when the primary gateway goes down.
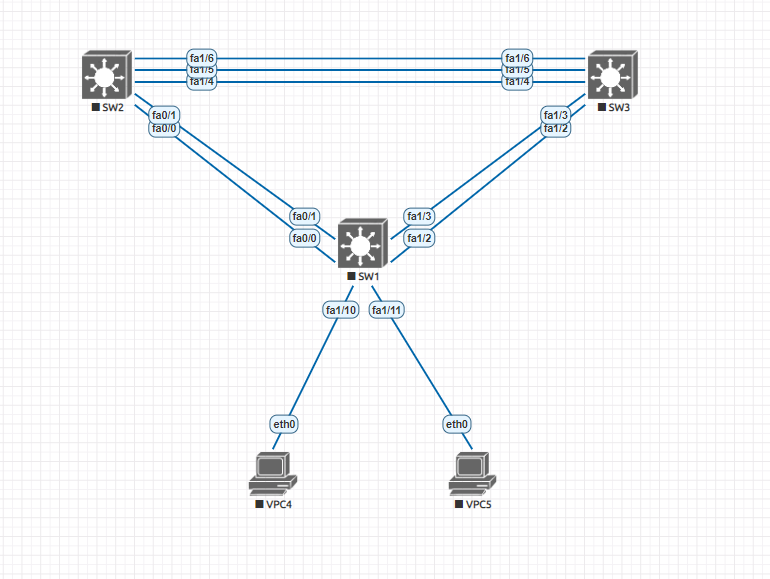
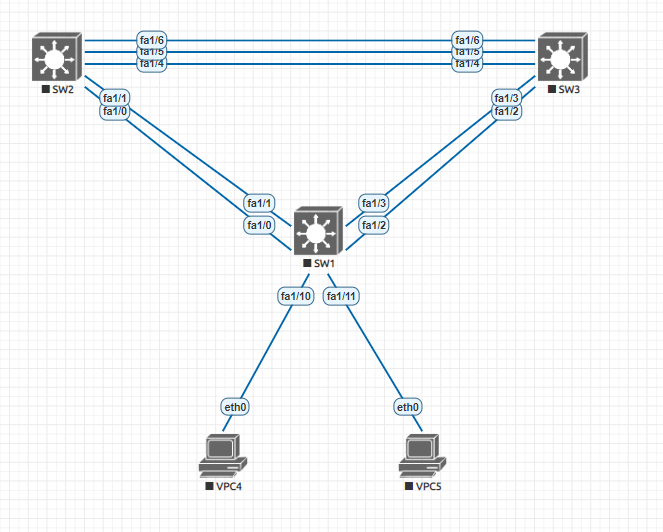
This lab will be utilizing eve-ng which consists of 3 switches and 2 pcs. Before we get started lets build out the basic lab configuration which consists of the following network addresses in the table below:
| Device | Interface | Ip Address | Default Gateway |
|---|---|---|---|
| SW1 | Lo 0 | 192.168.1.1/24 | |
| Vlan 10 | 10.10.0.1/24 | ||
| Vlan 20 | 10.20.0.1/24 | ||
| SW2 | Lo 0 | 192.168.1.1/24 | |
| Vlan 10 | 10.10.0.2/24 | ||
| Vlan 20 | 10.20.0.2/24 | ||
| pc1 | Nic | 10.10.0.50/24 | 10.10.0.254/24 |
| pc2 | Nic | 10.20.0.50/24 | 10.20.0.254/24 |
Basic Network Configuration Settings
First lets build out the initial configuration of all of the devices before we get started.
Switch SW1 Configuration
First we take switch D1 and configure the initial trunk ports. A trunk port is a special port that allows data from multiple vlans to flow across.
SW1(config)#interface range fa 1/0 - 4
SW1(config-if-range)#switchport mode trunk

SW1(config-if-range)#no shutdown
Next lets create the our channel groups that will define our redundant interfaces that will be running LACP. Then also we will create our vlans. Since my lab is only allowing the “On” mode for my channel-group but “active” can be used instead.
SW1(config)#interface range fa 1/0 - 1
SW1(config-if-range)#channel-group 1 mode active
SW1(config)#interface range fa 1/2 - 3
SW1(config-if-range)#channel-group 2 mode active
SW1(config)# interface vlan 10
SW1(config-vlan)# name first_vlan
SW1(config) interface vlan 20
SW1(config-vlan) name second_vlan
Now lets finish up with SW1 with adding our access ports the pcs will be connect to into the correct vlan, adding a default gateway and and ip address to vlan 10. Take note of the highlighted sections about spanning-tree portfast
SW1(config)#interface fa 1/10
SW1(config-if)#switchport mode access
SW1(config-if)#switchport access vlan 10
SW1(config-if)#spanning-tree portfast
%Warning: portfast should only be enabled on ports connected to a single host.
 Connecting hubs, concentrators, switches,  bridges, etc.to this interface
 when portfast is enabled, can cause temporary spanning tree loops.
 Use with CAUTION
%Portfast has been configured on FastEthernet1/10 but will only
 have effect when the interface is in a non-trunking mode.
SW1(config-if)#no shut
SW1(config-if)#int fa 1/11
SW1(config-if)#switchport mode access
SW1(config-if)#switchport access vlan 20
SW1(config-if)#spanning-tree portfast
%Warning: portfast should only be enabled on ports connected to a single host.
 Connecting hubs, concentrators, switches,  bridges, etc.to this interface
 when portfast is enabled, can cause temporary spanning tree loops.
 Use with CAUTION
%Portfast has been configured on FastEthernet1/11 but will only
 have effect when the interface is in a non-trunking mode.
SW1(config-if)#no shut
SW1(config-if)#interface vlan 10
SW1(config-if)#ip add
SW1(config-if)#ip address 10.10.0.3 255.255.255.0
SW1(config-if)#no shut
SW1(config-if)#exit

SW1(config)#ip default-gateway 10.10.0.254
Now with the switch config done lets configure the pcs. When using eve-ng a pc configuration consists of the following command:
VPCS > ip 10.10.0.50/24 10.10.0.254Switch SW2 Configuration
Now this switch will have a similar configuration will have a similar configuration with some slight differences for our cisco hsrp configuration. Now lets add those ports to their own channel group, create our needed vlans, and loopback and interface vlans.
SW2(config)#interface range fa 1/0 - 1
SW2(config-if-range)#switchport mode trunk
SW2(config-if-range)#no shutdown
SW2(config-if-range)#channel-group 1 mode on
SW2(config-if-range)# interface range fa 1/4 - 6
SW2(config-if-range)#switchport mode trunk
SW2(config-if-range)#no shutdown
SW2(config-if-range)#channel-group 6 mode on
SW2(config)#interface vlan 10
SW2(config-if)#ip address 10.10.0.1 255.255.255.0
SW2(config-if)#no shut
SW2(config-if)#interface vlan 20
SW2(config-if)#ip address 10.20.0.1 255.255.255.0
SW2(config-if)#no shut
SW2(config-if)#int loopback 0
SW2(config-if)#ip address 192.168.1.1 255.255.255.0
SW2(config-if)#no shut
SW2(config-if)#exit
SW2(config)#vlan 10
SW2(config-vlan)name first_vlan
SW2(config-vlan)vlan 20
SW2(config-vlan)name second_vlan
Switch SW3 Configuration
Now the last switch configuration before we get into setting up the cisco hsrp configuration. Just like SW2 this will be almost identical.
SW3(config)#interface range fa 1/2 - 3
SW3(config-if-range)#switchport mode trunk
SW3(config-if-range)#no shutdown
SW3(config-if-range)#channel-group 2 mode on
SW3(config-if-range)# interface range fa 1/4 - 6
SW3(config-if-range)#switchport mode trunk
SW3(config-if-range)#no shutdown
SW3(config-if-range)#channel-group 6 mode on
SW3(config)#interface vlan 10
SW3(config-if)#ip address 10.10.0.2 255.255.255.0
SW3(config-if)#no shut
SW3(config-if)#interface vlan 20
SW3(config-if)#ip address 10.20.0.2 255.255.255.0
SW3(config-if)#no shut
SW3(config-if)#int loopback 0
SW3(config-if)#ip address 192.168.1.1 255.255.255.0
SW3(config-if)#no shut
SW3(config-if)#exit
SW3(config)#vlan 10
SW3(config-vlan)name first_vlan
SW3(config-vlan)vlan 20
SW3(config-vlan)name second_vlan
How to configure and observe Cisco HSRP
HSRP (hot standby redundancy protocol) provides not only redundancy throughout a network but also the traffic can be load-balanced. Both SW2 and SW3 can route between the SVI (switch virtual interfaces). HSRP will help determine which switch accepts information that will flow towards the virtual gateway.
Lets get started in configuring the standby command to get hsrp started. Then we will set a higher priority on SW2 for vlan 10 and a higher priority for SW3 for vlan 20.
SW2 HSRP Configuration
SW2(config)#interface vlan 10
SW2(config-if)#standby version 2
SW2(config-if)#standby 10 ip 10.10.0.254
SW2(config-if)#standby 10 priority 150
SW2(config-if)#standby 10 preempt
SW2(config)#interface vlan 20
SW2(config-if)#standby version 2
SW2(config-if)#standby 20 ip 10.20.0.254
SW2(config-if)#standby 20 preempt
SW3 HSRP Configuration
SW2(config)#interface vlan 10
SW3(config-if)#standby version 2
SW3(config-if)#standby 10 ip 10.10.0.254
SW3(config-if)#standby 10 preempt
SW3(config)#interface vlan 20
SW3(config-if)#standby version 2
SW3(config-if)#standby 20 ip 10.20.0.254
SW2(config-if)#standby 20 priority 150
SW3(config-if)#standby 20 preempt
Validating Cisco HSRP Configuration
Now that we have the cisco hsrp configuration finished we can validate the results and tune some settings. From either switch you can issue the command show standby brief and you should get an output similar to the picture below

Lets do some testing. On Vpc4 I will run a continuous ping to the loopback address 192.168.1.1 which is essentially our dummy test outside IP. issue the “shutdown” command on interface vlan 10 and you should get minimal packet loss as the devices transition over to the new device.
Conclusion
In this article, we walked through the cisco hsrp configuration on Cisco devices. HSRP can be found in many cisco networks that need redundancy for backup default gateways, you just need to take with you the commands from this article and test them in your environment.


Hi, would you please tell me the name of the ios that you are using for switches in EVE-NG?
In this particular lab im using the C3725-adventerprisek9-mz.124-15.T14.image on the switches.