LACP and PAgP support a variety of load balancing algorithms to help maintain even distribution of traffic across an Etherchannel bundle. In this lab we will explore some of the tuning options for LACP, as well as the load balancing options for Etherchannel in general. Check out our previous lab here on configuring Etherchannel, In this lab we will start with 2 fresh cisco switches with no preconfigured startup configs.
Part 1: Configure Basic Switch Settings
Use the basic commands to configure basic config settings on your switch. Port configuration may vary depending on device type.
Configuring Switch D1
- hostname D1
- banner motd # D1, configure etherchannel load balancing #
- spanning-tree mode rapid-pvst
- line con 0
- exec-timeout 0 0
- logging synchronous
- exit
- interface range ethernet 0/0-3
- switchport mode trunk
- no shutdown
- end
- copy run start
Configuring Switch D2
- hostname D2
- banner motd # D2, configure etherchannel load balancing #
- spanning-tree mode rapid-pvst
- line con 0
- exec-timeout 0 0
- logging synchronous
- exit
- interface range ethernet 0/0-3
- switchport mode trunk
- no shutdown
- end
- copy run start
Part 2: Tune and Configure LACP Etherchannels
A LACP-based etherchannel bundle can contain up to 16 allocated ports. Eight active ports are passing traffic, while the remaining eight are on standby. When the total number of ports in a LACP bundle surpasses 8, the switches in the bundle negotiate a master/slave relationship, and the designated master decides which members are active and which are on standby.
Let’s create an Etherchannel bundle using LACP with a minimum of two and a maximum of three links. Then you’ll decide which switch is the master. Then, to minimize the time out period from 30 seconds to 1 second, we’ll enable LACP fast packets.
Configure master switch
Each connected LACP switch has a system ID value. The switch with the lowest number will be considered the master. Depending on network configuration this may not be best fit. The system ID value is a combination of a system priority that defaults to 32768 and the base MAC address.
We can issue the “show lacp sys-id” in privaleged exec mode to see what the value of D1 and D2. Based on the images below we can see that switch D1 is the bundle master


we can modify the system priority value to choose the switch that we want to become master. Use the “lacp system-priority” to set the value to 1. We will change this on switch D2

Configure member preferences and bundle size
By default, interfaces are selected to be included in the active bundle based on the interface id. For a given configuration, the lower numbered interfaces are added to the bundle until the bundle has reached its maximum size. Any interfaces left are put in a hot standby mode.
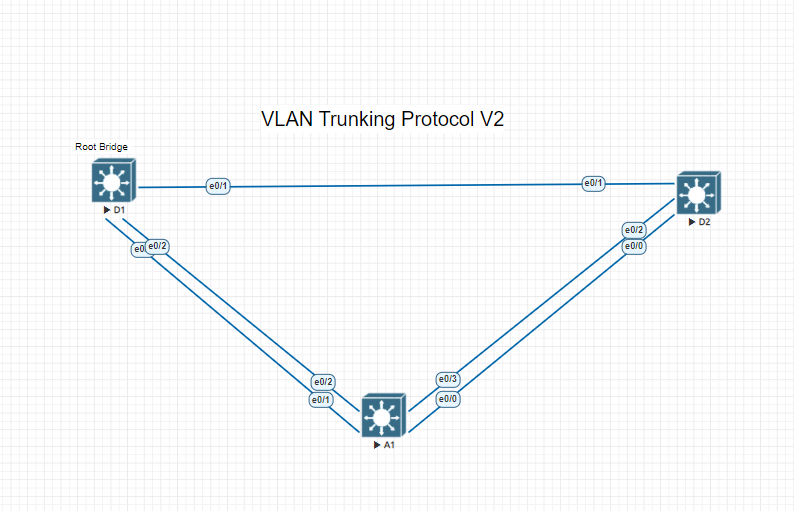
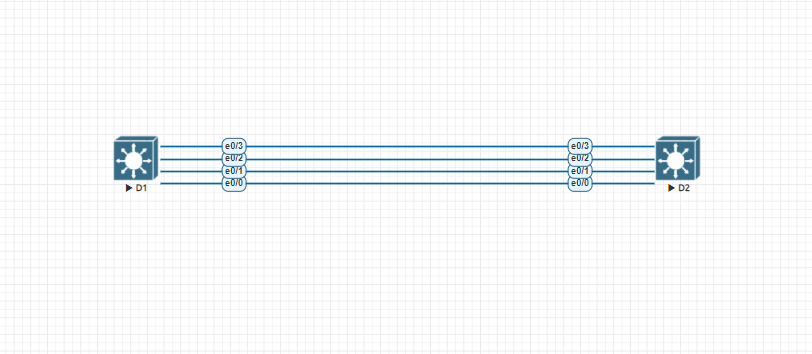
Issue the “shutdown” command on interfaces connecting D1 and D2, then configure the interfaces into a single LACP Etherchannel bundle using Group number 12 and active mode.
- D2# config t
- D2 (config)# interface range ethernet 0/0-3
- D2 (config-if-range)# shutdown
- D2 (config-if-range)# channel-group 12 mode active
- D2 (config-if-range)# no shutdown
after issuing the above commands on both switches lets configure the port-channel 12 interface with a minimum bundle size of 2 interfaces, and maximum of 3 interfaces.
- D2 (config) # interface port-channel 12
- D2 (config-if) # port-channel min-links 2
- D2 (config-if) # lacp max-bundle 3
Verify the etherchannel bundle has formed and take note of the ports included vs the ports in hot standby mode.
Part 3: Configure Etherchannel Load Balancing
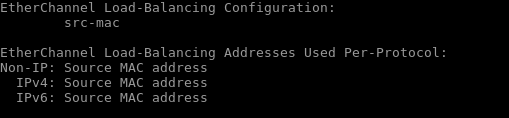
Etherchannel load balancing method used to send traffic through an Etherchannel is a global setting. The Etherchannel Load Balancing methods used at either end of the Etherchannel bundle do not have to match. Issue the “show etherchannel load-balance” to see what method is being used. This can be changed to something else using the “port-channel load-balance” in configuration mode.
A way to see what path the load balance path will choose is by issuing the command “show platform software fed etherchannel [switch switch-number] channel-group-number [group-mask | load-balance mac src-mac dst-mac [ip src-ip dst-ip [port src-port dst port]]
using these commands will allow you to verify how the default load-balancing scheme is working, and then try out other load-balancing mechanisms to see how the behavior changes.