Many companies will start to adopt some form of IAC (infrastcuture as code) tool. One of the most popular tools is Terraform. With companies moving to the cloud at a rapid pace many people will find themselves needing to import most of your entire azure environment.
You can now import your entire azure environment using a tool called terrafy. This tool was recently developed with the idea of being able to generate code for your existing azure resources. In this guide we will go over the following steps to getting started with terrafy.
- How to setup and install terrafy
- How to run terrafy against your existing azure environment
- Terrafy Commands
- Terrafy Limitations
How to setup and install terrafy?
Terrafy or (aztfy) can be installed on either linux or windows. I have found more success with installing on a macbook since it comes to less problems to troubleshoot. If installing on windows, download the latest binary and place the exe into preferably the same location your terraform binary is located.
If you have not installed terraform you will need to download terraform and put the PATH in your system environment variables. The rest of this document will go through how to setup terrafy using a mac.
Terrafy Installation requirements
First you need to have the following prerequisites for terrafy to work correctly on your mac:
- The latest version of azure cli
- Terraform
- homebrew installed
homebrew is optional but its the application of choice when it comes to needing to install applications fast and easy. If you don’t have brew installed open your mac terminal and run the command:
/bin/bash -c "$(curl -fsSL https://raw.githubusercontent.com/Homebrew/install/HEAD/install.sh)"Then download azure cli from the terminal using the below command:
brew update && brew install azure-cliAnd lastly terraform can be installed using homebrew as well:
brew tap hashicorp/tap
brew install hashicorp/tap/terraform
How to setup the terrafy application
Once all the terrafy prerequisites are installed you can begin to download and install terrafy. Terrafy’s github repo holds the download for the aztfy application. First we need to install the aztfy application.
Connecting to azure
brew install aztfyOnce installed connected to your azure environment using the command
az loginImport an azure resource group using terrafy
Now that your logged into azure lets import a resource group. First we need to create an empty directory from the cli. Then Take the desired resource group you would like to import and run the aztfy command inside of that directory.
mkdir terrafy
cd terrafy
aztfy rg <resource group name>
The directory name can be whatever you would like to call it and needs to be empty. This is the first step needed to import your entire azure environment using terrafy. Terrafy will display a list of resources that will be imported or skipped from the resource group.
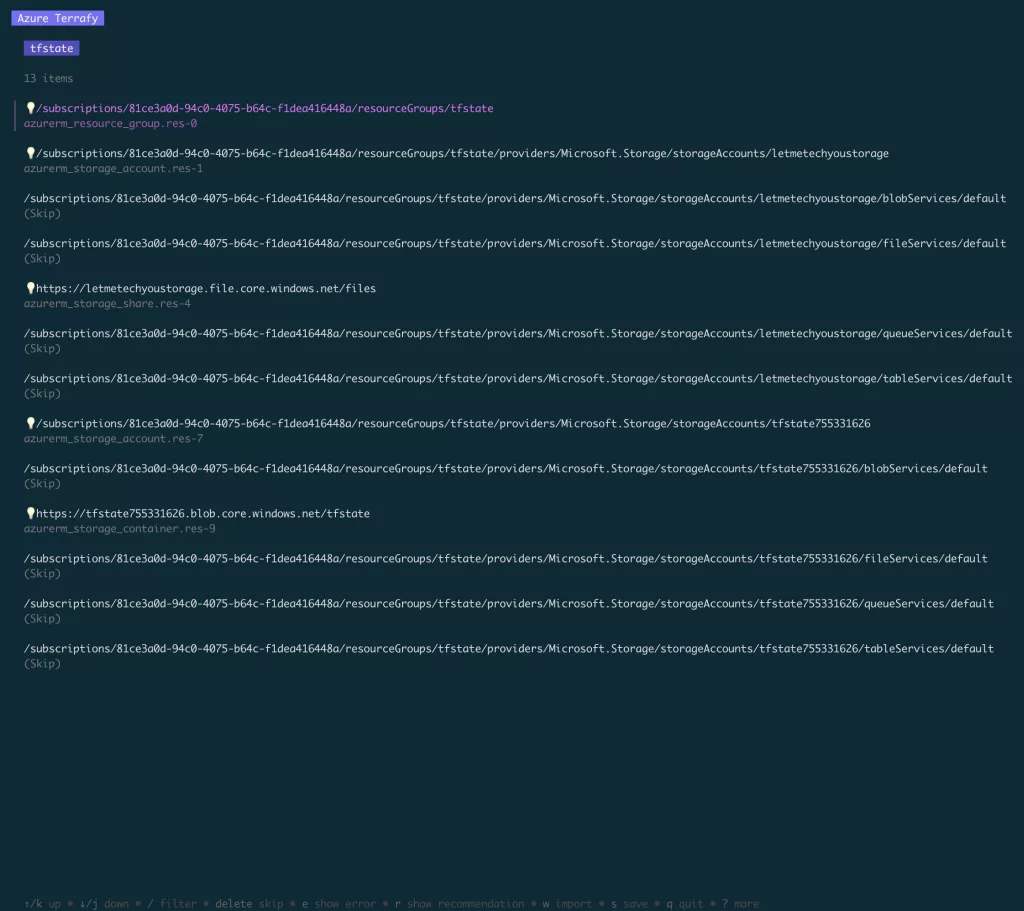
Any resource with a light bulb next to it indicates its able to be imported. The resources with skips are not able to. This screen also gives you the option to rename the terraform resources names by pressing enter on each line. Instead of azurerm_resource_group.res-0, you can change it to be azurerm_resource_group.main.
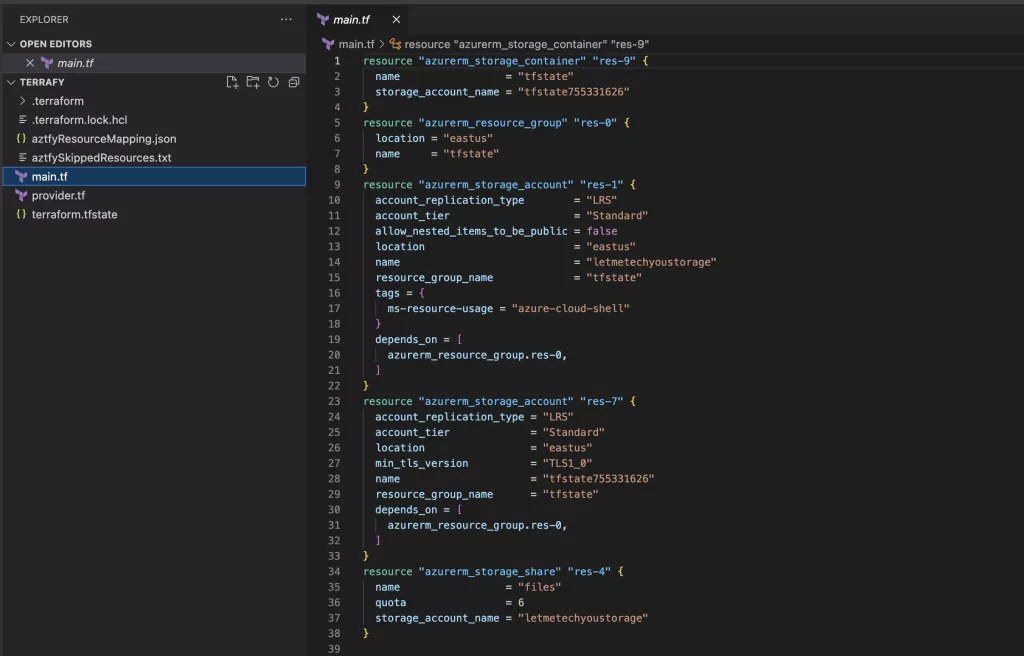
Once done making any changes on this screen you can press the “w” key to continue with the import. You should now have a main.tf and provider.tf file inside your folder. You now have terraform code of the existing resource groups.
Import individual azure resources using terrafy
If you dont need to import an entire resource group but only want to manage certain resources, you can do the same steps above but the command will change to:
aztfy res <resource id>The resource id can be found on the particular resource in azure under the properties.
Create a mapping file to import multiple resources using terrafy
If needing to import multiple resources you can generate a mapping file. A mapping file will need to be in the format
{
    "<Azure resource id1>": {
        "resource_type" : "<terraform resource type>",
        "resource_name" : "<terraform resource name>",
        "resource_id"   : "<terraform resource id>"
    },
    "<Azure resource id2>": {
        "resource_type" : "<terraform resource type>",
        "resource_name" : "<terraform resource name>",
        "resource_id"   : "<terraform resource id>"
    },
    ...
}
Then when running aztfy you will need to make sure you call the mapping file needed.
aztfy mapping-file [option] <resource mapping file>Terrafy Commands
Terrafy does not have many commands but it does have enough other options that could be useful while trying to import your entire azure infrastructure using terrafy. These commands also have additional options depending on the command used. the aztfy help command can give you all the information you need.
NAME:
aztfy – Bring existing Azure resources under Terraform’s management
USAGE:
aztfy [command] [option]
COMMANDS:
resource, res Terrafying a single resource
resource-group, rg Terrafying a resource group and the nested resources resides within it
query Terrafying a customized scope of resources determined by an Azure Resource Graph where predicate
mapping-file, map Terrafying a customized scope of resources determined by the resource mapping file
help, h Shows a list of commands or help for one command
GLOBAL OPTIONS:
–help, -h show help (default: false)
–version, -v print the version (default: false)
Limitations to using Terrafy
When it comes to trying to import your entire infrastructure using terrafy, there are some limitations you may run into. Some of the top issues you may run into using terrafy are:
- Some resources may not be able to be imported and must be done manually
- All the properties of the resources may not be imported in
- aztfy will generate hard coded depends_on blocks for resources
- Everything is defined in a static way so you may need to do some refactoring of the code to make it use variables.
Now this list isn’t a show stopper in terms of using aztfy. It still does a lot of the heavy lifting vs having to import resources in the manual way using terraforms native method.
Conclusion
Terrafy is currently continuing to be developed. You can submit any issues you may have to the github issues and the team is pretty responsive in getting back with you. This tool makes for a great way to start your cloud and IaC journey by bringing in resources that you manage a lot manually.
