We’ll talk about how to locate the default spanning tree in this section of the lab. Spanning tree is enabled by default, so as soon as you connect your switches, they will all begin to configure themselves according to their internal calculations. Finding out what the default spanning tree looks like and how it converged can aid in troubleshooting and/or customizing the setup to your satisfaction. The following is a list of the tasks we will complete in this lab:
- We’ll start by looking for the root bridge.
- Then we’ll look for the root ports.
- Then find which ports are designated and non designated ports
How to find the spanning tree topology root bridge
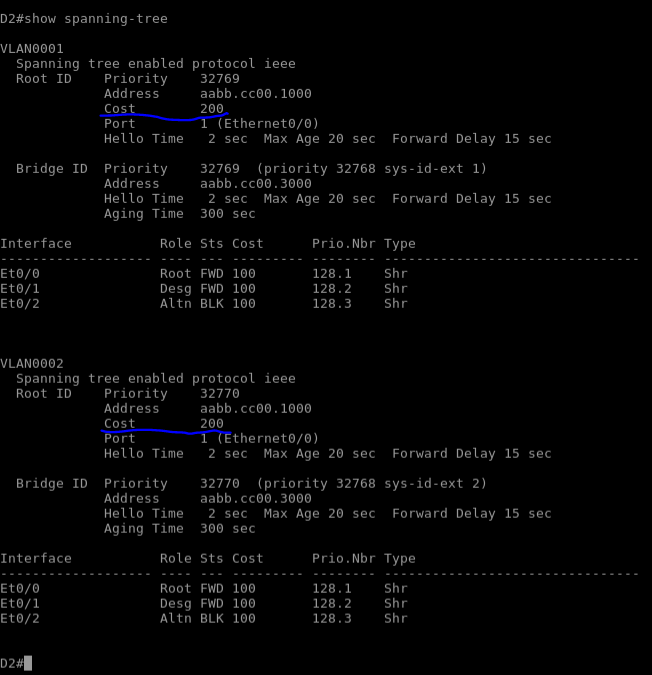
When looking for the root bridge on a switch with multiple vlans, you should have multiple root bridges. To find those specific root bridge ports head over to enable mode and enter the command “show spanning-tree root” and you should get an output like below.

As you can see, each vlan’s root port is E 0/1. The switch with the highest bridge ID and the switch’s mac address define the root ID. The priority value is set to 32768 by default, but since we’re using PVST (per vlan spanning tree), it’s changed to the extended system ID, which is identical to the VLAN number. When all of the devices’ priority values are the same, the rest of the BID is considered, which includes the base MAC address. To break the tie, the lowest MAC is selected, which may not be the best switch in some networks.

How to find the root port for each switch
Each switch has a single root port which represents the lowest path cost back to the root bridge. Port cost is based on the bandwidth value of each port which is either dynamically or statically configured. Below is a list of the port cost that is configured based on the bandwidth of each port.
- 10Mbps = 100
- 100Mbps = 19
- 1Gb = 4
- 10Gb = 2
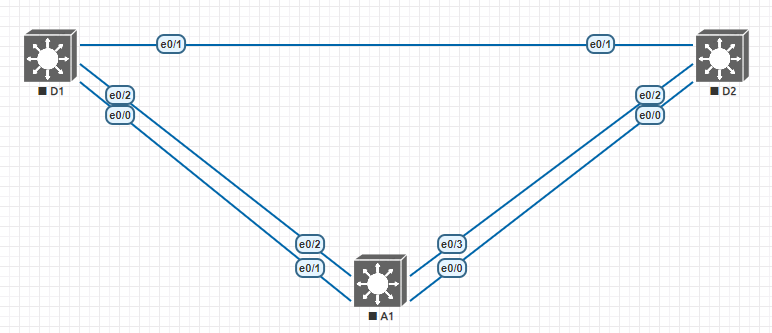
We can see that the root cost was 100 in the earlier output of the “show spanning-tree root” command, indicating that we have a 10Mbps connection to the root bridge. Because we have a direct connection to the root bridge on Switch D2, the topology we have setup does not indicate a significant difference between path and port costs. I’m going to shut down the root port of e 0/1 on switch D1 and compare the new path cost to the previous one. The new path for switch D2 must pass through two connections, each costing 100.
How to identify designated spanning tree ports
The job of the designated ports to ensure that the end users have a way to access the network. The designated ports stay active sending BPDUs (bridge protocol data unit) and learning MAC addresses. Every port on the root bridge is a designated port. There is one designated port on every segment that is not directly attached to the root. On the other side of designated ports you may have some ports that are deemed “altn” “blocking”. These states indicate that this link will not learn MAC addresses or forward traffic until they move to the designated state.