As more companies move to the cloud, many companies will need to create an aws vpc using terraform. Terraform helps eliminate manual task you would normally do using the cloud providers interface. There are various tools that can be used such as cloudformation, pulumi, Azure blueprints to build out your environments.
For the purpose of this lab we will be using terraform which is one of the most popular.
What Is Terraform
Terraform is an open source software tool that allows you to Create, Read, Update and Delete infrastructure. All this can be done using human-readable configuration files.
Terraform uses what called a provider to connect into cloud platforms and other services APIs. This allows you to manage everything from compute, storage and networking resources. A list of the different types of providers can be found here.
Terraform is written in what’s called the hashicorp configuration language (HCL) which can be learned very easily from their documentation. The basic concept of terraform consists of 3 stages:
- Write: Define and write out the resources, providers and services you will be interacting with
- Plan: Create an execution plan to make sure what you wrote describes what you want to do whether that consist of creating, updating or deleting.
- Apply: Once the plan is approved terraform will apply the operation in the correct order for you
How to Setup Terraform
Before you can create an aws vpc using terraform, you must install this on your pc. Visit the terraform.io/downloads to download the latest version for your pc. Assuming you are working with windows, a zip file will get downloaded to your computer.
Installing Terraform
Follow these steps to get terraform to work correctly on your pc:
- First unzip the folder
- Create another folder called terraformaws on your C: drive
- Then create another folder inside the terraformaws folder called bin
- Go into the advanced system settings on your computer
- Environment Variables
- Then add the path to the exe in the user variables.
This now allows you to run the terraform command in the command prompt without having to use the absolute path.
Setting up Terraform Cloud
So that we can save our aws credentials in the cloud we will setup terraform cloud which is free for personal use. This will also help better secure and backup our state file which holds sensitive data about the environment. Visit the cloud hashicorp website here and signup.
Creating a Terraform IAM user
Next you will need an AWS user that has permissions to connect into your account to create resources. I recommend to not use the root account when doing this. In IT least privileged access is a method where you give a user only the permissions needed to do a role. Now in our case since we are only creating a vpc with a public and private subnet so this should be enough.
Create a user that has the “AmazonVPCFullAccess” policy attached to it. Now this could be too much for what you need but its at least not full admin access to your account.
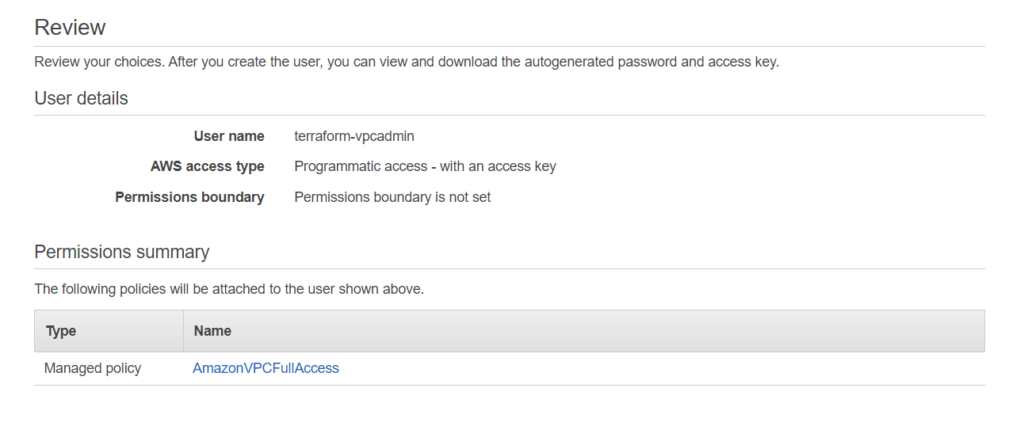
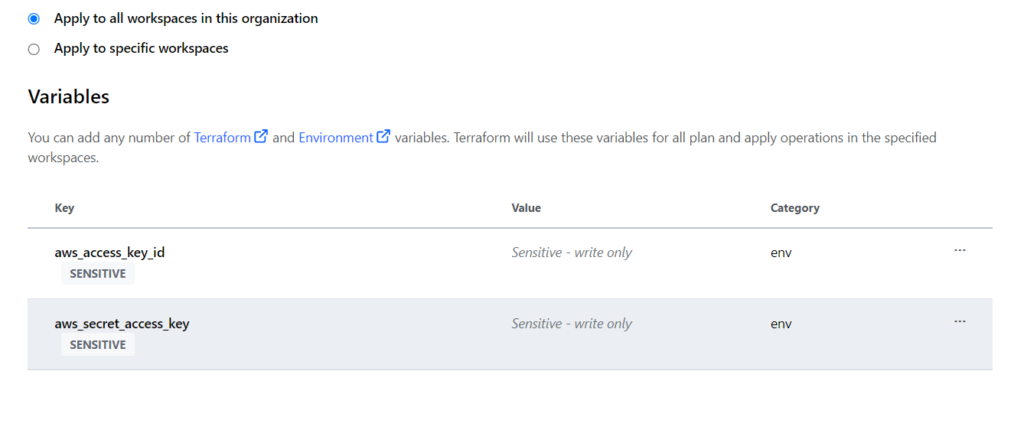
Once the user is created, you will need to download the csv that’s provided and login to your terraform cloud account. Go to the settings and create a variable set. Name your variable and towards the bottom and enter your variables in like the picture below from the csv.
Now that we have the credentials setup in the cloud, now I can show you how to create an aws vpc using terraform.
Terraform VPC Configuration
The .tf suffix is read and processed by Terraform. Consequently, straightforward Terraform configurations may be made with just one file (for example main.tf). Create a folder called terraformaws and inside of that a file called main.tf. In this file we will paste the following code. Make sure to keep the same formatting as much as possible or terraform will error out when ran.
I placed comment marks above each section detailing what that part is doing.
#this is stating we are using terraform in the cloud and to create a workspace called terraform-vpc-workspace and the required provider is aws
terraform {
  cloud {
    organization = "ysugrad"
    workspaces {
        name = "terraform-vpc-workspace"
    }
  }
  required_providers {
    aws = {
      source  = "hashicorp/aws"
       version = "= 3.74.2"
    }
  }
}


provider "aws" {
  region = "us-east-1"
}

#creat a vpc using the 10.0.0.0/16 cidr block
resource "aws_vpc" "vpc" {
    cidr_block = "10.0.0.0/16"
}

#create a elastic ip address
resource "aws_eip" "nat" {
    vpc = true
}

#create an internet gateway
resource "aws_internet_gateway" "igw" {
    vpc_id = aws_vpc.vpc.id
}

#create nat gateway and depends on internet gateway to be created first
resource "aws_nat_gateway" "natgw" {
    allocation_id = aws_eip.nat.id
    subnet_id     = aws_subnet.public.id
    depends_on    = [aws_internet_gateway.igw]
}

#create a 10.0.10.0/24 public subnet and choose the first available az in the region
resource "aws_subnet" "public" {
    vpc_id        = aws_vpc.vpc.id
    cidr_block    = "10.0.10.0/24"
    availability_zone = data.aws_availability_zones.available.names[0]
}

#create a 10.0.20.0/24 private subnet and choose the first available az in the region
resource "aws_subnet" "private" {
    vpc_id        = aws_vpc.vpc.id
    cidr_block    = "10.0.20.0/24"
    availability_zone = data.aws_availability_zones.available.names[0]
}

#create a route table and create a route to the internet gateway
resource "aws_route_table" "publicrt" {
    vpc_id = aws_vpc.vpc.id
    route {
        cidr_block = "0.0.0.0/0"
        gateway_id = aws_internet_gateway.igw.id
    }
}

#associate the route table with the public subnet
resource "aws_route_table_association" "publicrtas" {
    subnet_id      = aws_subnet.public.id
    route_table_id = aws_route_table.publicrt.id
}

#create a private route table and create a route to the nat gateway
resource "aws_route_table" "privatert" {
    vpc_id = aws_vpc.vpc.id
    route {
        cidr_block = "0.0.0.0/0"
        nat_gateway_id = aws_nat_gateway.natgw.id
    }
}

#associate the route table with the private subnet
resource "aws_route_table_association" "privatertas" {
    subnet_id      = aws_subnet.private.id
    route_table_id = aws_route_table.privatert.id
}

data "aws_availability_zones" "available" {

state = "available"

}
Once you have your code in the main.tf file and saved. Navigate to that folder in the command line and enter the command “terraform login”
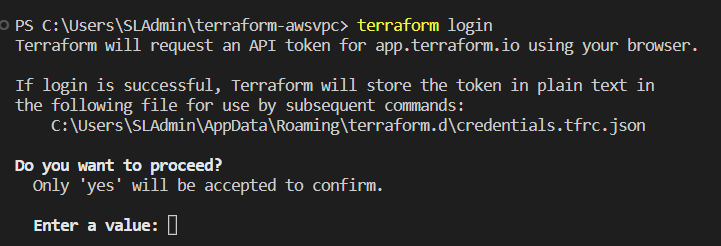
Enter yes and follow the prompts needed to connect your machine to the cloud to access your aws credentials.
Next run “terraform init”. This will download the needed terraform modules to your computer based on the required version. Then run “terraform plan”. Running this command is a safe way to make sure that you are not doing something destructive like deleting anything. After that run “terraform apply and enter yes to accept.
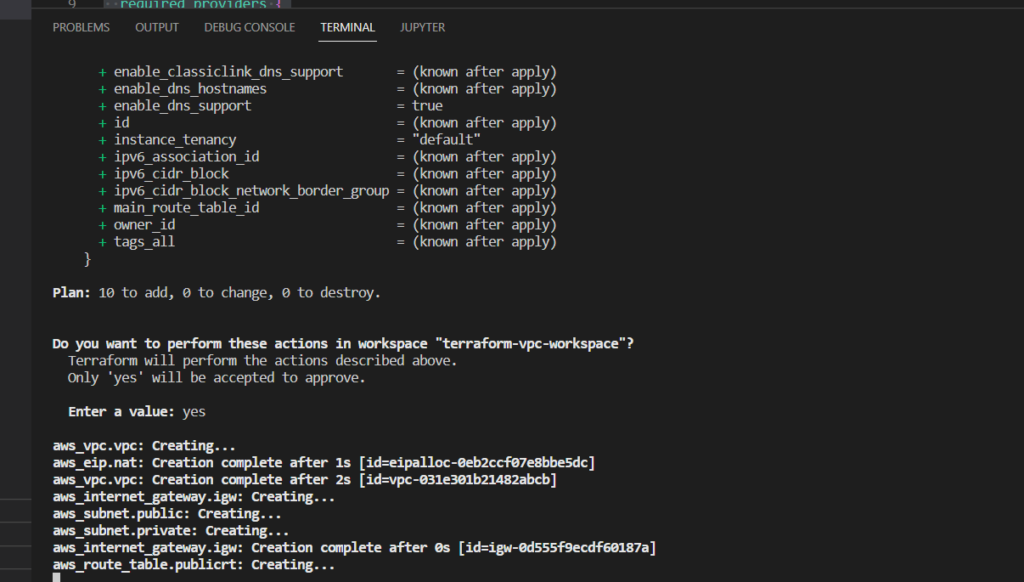
Your configuration will start to apply and create itself in your aws account.
Conclusion
As you can see creating an aws vpc using terraform can help build environments that are easily deployable time after time. Although the initial code configuration may take some time, You can continue to use this same code in different environments possibly. Now that may require some changes such as removing static values from the code but that can come as you grow.
Now that this lab is over we want to make sure we destroy this lab if its only used for lab purposes by using the command “terraform destroy”