The Amazon Virtual Private Cloud is a virtual network that contains EC2 (Elastic Compute) instances as well as network resources for other AWS services. By default, every VPC is securely isolated from all other network. You can in certain ways connect other VPCs to other networks such as the Internet or other VPCs.
If you are an AWS Architect or helping your company build out it’s VPC foundation, understanding how they operate will aid in the fundamental success of the business and your career as you start to grow. To keep this guide simple ill start with assuming were configuring one VPC in a single region.
If your familiar with traditional networking, then you may find many of the VPC components to be familiar. The reason VPCs are so scalable because unlike traditional networks, Amazon uses software to abstract routers, switches, and vlans to allow businesses to scale quickly. Here are a list of things we will cover in this guide:
- VPC CIDR Blocks
- How to Subnet your CIDR Blocks
- Availability Zones
- Elastic Network Interfaces
- Internet Gateways
- Route Tables
- Security Groups
- Network Access Control Lists
- Public & Elastic IP Addresses
- Network Address Translation
- VPC Peering
After going through this guide, not only will you have gained all the knowledge you need to build and secure your own Virtual Private Cloud, you will be one step closer to becoming a great amazon network architect.
VPC CIDR Blocks
When creating a new Virtual Private Cloud you must create at least one Block of IP addresses that can be assigned to instances and other resources within the VPC. When working with private IP addresses your blocks will typically fall within these ranges:
- Class A Range 10.0.0.0 – 10.255.255.255 or 10.0.0.0/8
- Class B Range 172.16.0.0 – 172.32.255.255 or 172.16.0.0/12
- Class C Range 192.168.0.0 – 192.168.255.255 or 192.168.0.0/16
If you plan on connecting your network to another network whether on premise or in the cloud, make sure that you don’t overlap with addresses already being used. Once you create the CIDR Block you cannot change it so think carefully about the address requirements. For our demo purposes were going to use 192.168.0.0/16 for our block.

Creating Subnets from your CIDR Blocks
Now that you have your VPC and CIDR created, we now need to break portions of that Block up for resources to be able to consume some of those IP addresses. A subnet allows you to isolate instances and portions of the network from each other. For instance we can create one subnet for public accessible Web Servers and another for Database servers.
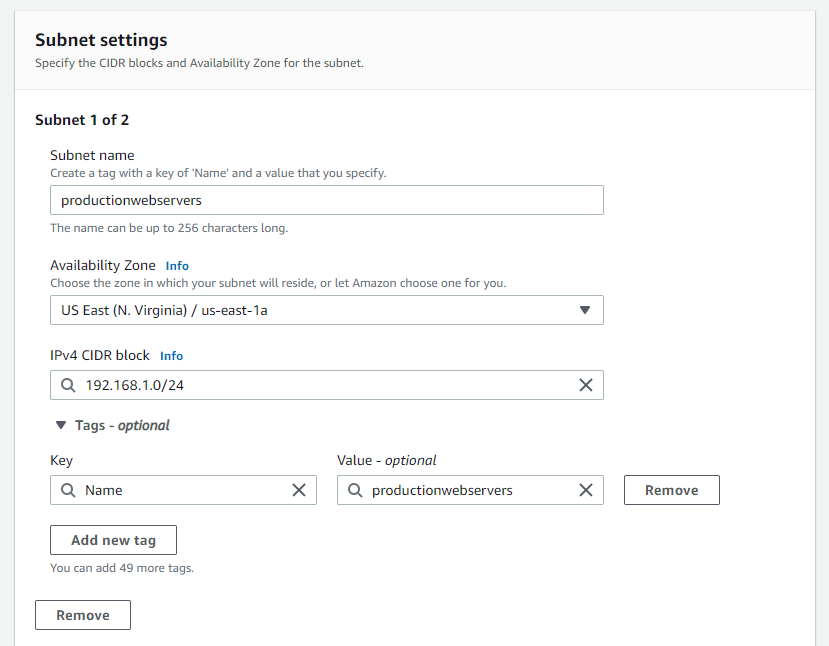
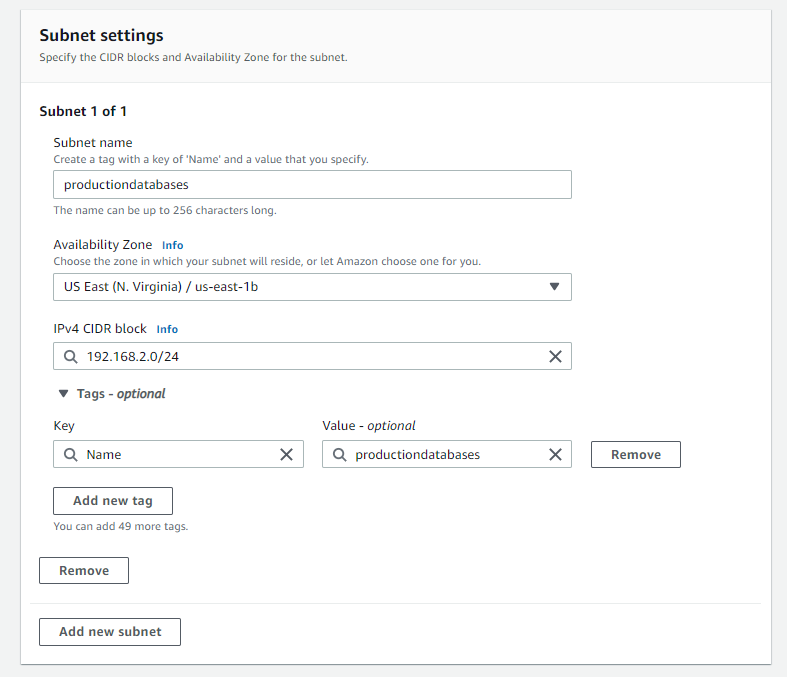
Subnet CIDR Blocks
Since our block begins with 192.168.0.0 we have to stay within the range up to 192.168.255.255. AWS reserves the first 4 IP addresses in every subnet. Subnets cannot overlap with each other so careful subnet planning is crucial here as well. To keep is simple as you can see in the pictures below I have created 2 subnets. 1 for the databases and 1 for the webservers.
Availability Zones
As your creating subnets you will see above that you have the option to choose what availability zone you want those subnets to sit in. An Availability Zone is roughly analogous to a small geographic location like a datacenter. They are designed so that a failure in one zone doesn’t cause failures in another.
You can create resiliency in your applications by creating two subnets in different zones and then spreading instances across those zones. Now if one of your zones fail you will only lose applications in that availability zone.
Elastic Network Interfaces
Elastic Network Interfaces (ENI) gives instances the ability to communicate with other network resources and making it possible for you to connect to your instances. The ENI is a network interface that every instance must have that cannot be moved once the primary interface is selected.
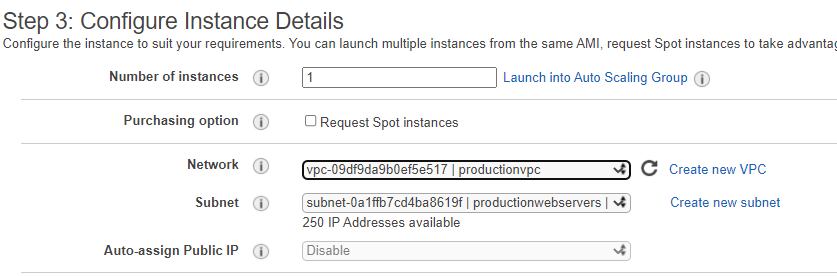
Now when you go to build a EC2 instance you will have the ability to place the instance the desired subnet and then select the desired network interface that you created.

Setting up AWS Internet Gateways
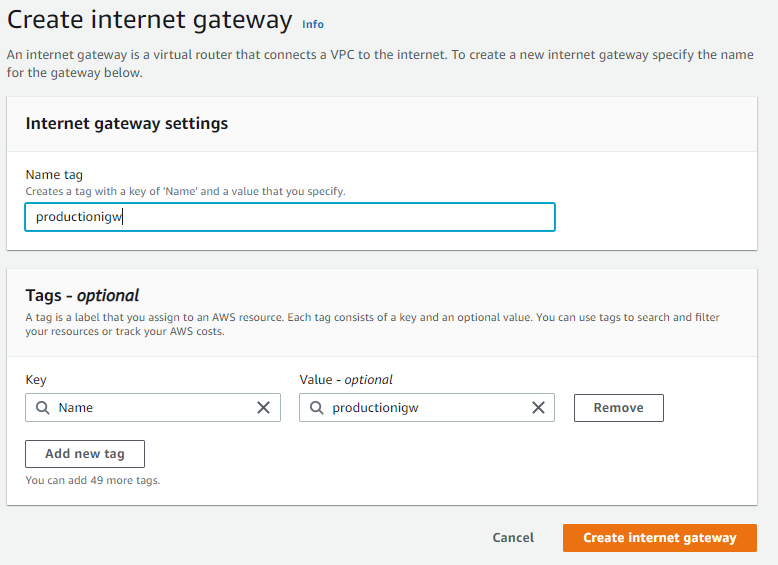
An internet gateway gives instances the ability to connect to the internet by receiving a public ip address. When creating a virtual private cloud, it does not have an internet gateway associated with it. You can think of an Internet Gateway like an Internet router that a service provider would provide on premises.
Unlike an Internet router that requires you to configure router settings an Internet gateway is configured in just a couple simple steps. On the VPC dashboard you will see an option on the left for Internet Gateway.
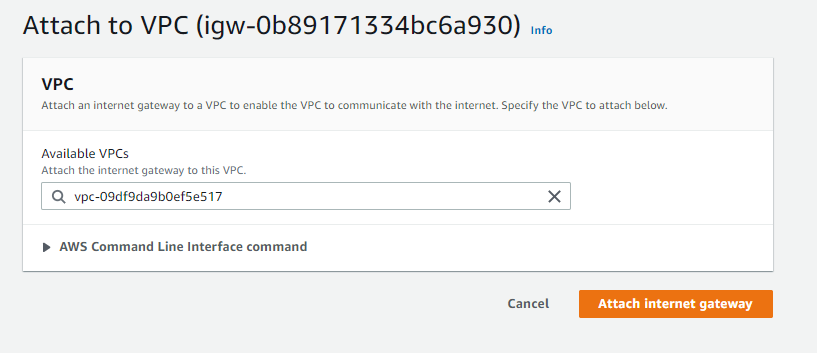
Even with an internet gateway, you will still need to create a route from your vpc to the internet by editing your route tables.
VPC Route Tables
When you create a VPC, AWS automatically creates a default route table called the main route table and associates it with every subnet on the vpc. Each route table consists of one or more routes and at least on subnet association. If you don’t explicitly associate a subnet with a route table, AWS will implicitly associate a subnet with the main route table.
Routes
Creating routes will help help traffic forward from instances within the subnets associated with the route table. The routing decisions are based only on the destination IP address, not the source. Every route table includes a local route that allows instances in different subnets to talk to each other.
Since there is no route automatically for anything destined outside the VPC, those packets will be dropped. Since we have our Internet Gateway already configured, we will create a default route pointing outbound traffic to the internet gateway.

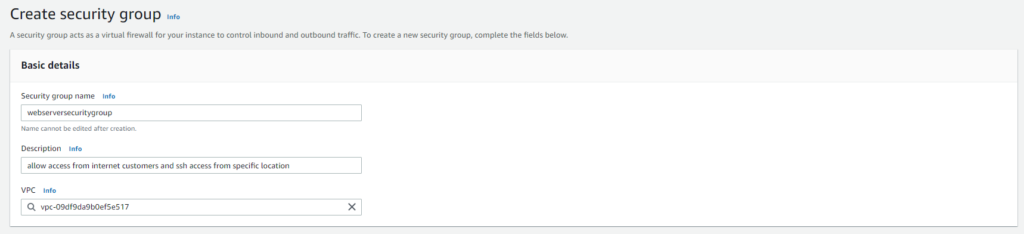
Creating Security Groups
AWS security groups act as a firewall that controls inbound and outbound traffic for an instance. Every elastic network interface must have at least one security group. When creating a security group you must specify inbound and outbound rules to allow traffic through the security group.
Security groups act as stateful firewalls, meaning when a security group allows traffic to pass in one direction, it knows to allow reply traffic in the other direction. Each VPC comes with a default security group that you cannot delete but you don’t have to use it.
Inbound Security Group Rules
Inbound rules consist of three required pieces:
- Source
- Protocol
- Range
If you want an instance running web applications you will want to allow anyone on the internet to connect via http or https. You will also need a way to manage the instance whether its through ssh or rdp, so we will need another rule that allows access from a specific IP address for better security.
To create a security group you can go to the VPC console and click on the security groups section. You can also go to the EC2 console and their is a security groups option under networking & security. Here is an example of the simple process to create a security group.

Outbound Security Group Rules
Outbound rules will specify where we will want our instances to connect to. If working with web servers that talk to the internet you will probably want to allow the instances to go everywhere. The only difference between an inbound rule and outbound rules is that the outbound rule specifies its destination and not source.

Network Access Control List
a Network Access Control List or (NACL) for short acts as a firewall that is attached to a subnet unlike a security group that is attached to a network interface. This means NACLs cannot be used to control traffic between instances in the same subnet.
A subnet can only contain one network access control list. When you create a new subnet in a VPC, the VPC’s default NACL is associated with that subnet. You can modify or use your own but the biggest difference is the fact that its stateless meaning that they don’t track the state of connection passing through it.
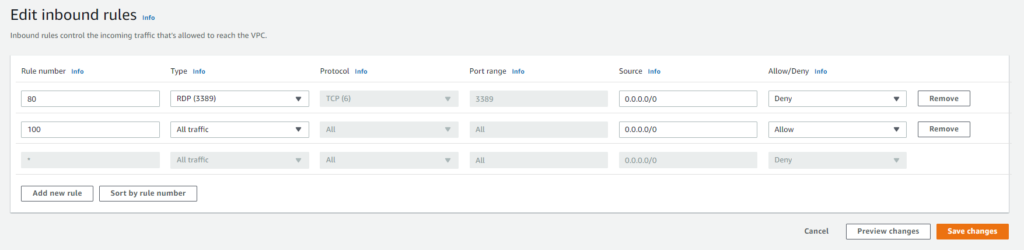
Inbound & Outbound NACL rules
Inbound and Outbound rules determine what traffic is allowed to enter or exit the subnet. Each rule will contain:
- Rule Number
- Protocol
- Port Range
- Source
- Action
Default NACL rules will look like below. NACL rules are processed in ascending order so the lowest number will be processed first. Rule 80 will block RDP access and then go to rule 100 and allow all other traffic. The last rule is an * and will deny any traffic that doesn’t match a rule above it.
To create a NACL or use the default one go to the VPC dashboard and click Network ACLs. You can either click on the default one for your vpc or create your own. If you create your own you must remember to not only create your inbound rules but you must create an outbound rule allowing at least access to the outside for ephemeral ports.
The range of ephemeral ports varies but these ports are what is used when for when a client listens for a reply. Using NACLs in addition to security groups will help users not have to always determine what security groups to be a part of when creating instances.
Public IP Addresses
During the process of creating an instance you will have the option to assign your instance a public ip address to become reachable over the internet. Once you create an instance you cannot go back and have AWS assign you one if you forgot. There are some downsides to using a public IP such as:
- Like we mentioned if you forget to assign the first time you cannot go back and do it
- When you stop or terminate an instance you will lose the public IP
- If you restart the instance you could receive a different IP and customers could lose access to the site.
if your instance does not need to maintain the same IP address then this approach will work. If you need something more persistent you can go with an Elastic IP Address
Elastic IP Addresses
An elastic IP Address is an address that AWS allocates to your account and you have exclusive of that address until you release it. You can only assign and elastic IP address to one network interface at a time. On your EC2 dashboard under Network & Security you can select elastic IP to get one assigned.
Once you obtain the IP address you must associate it with either an instance or network interface. Assigning it with a network interface will allow you to easily associate that interface to another instance that you spin up.
Now that you have an elastic IP assigned to your network interface, as long as you have rdp, http or whatever protocol you want to access the instance with in a security group or NACL, you will be able to connect to your instance over the internet.
Network Address Translation Devices
Sometimes you will want to have devices connect to the internet to pull think like updates or upload data but you dont want anyone to connect to these instances. That is when you can use a NAT devices that gets associated with a public IP address and not the instance itself.
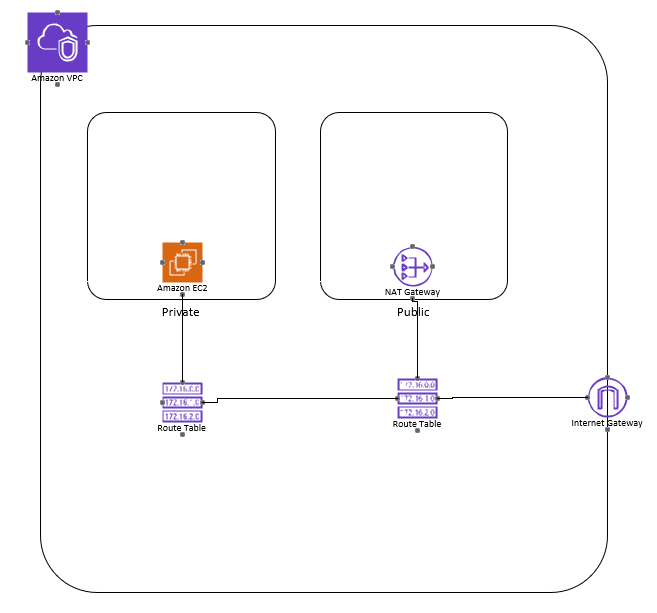
NAT Gateways
NAT gateways are the easiest way to go since you don’t have to worry about using or managing instances. To create one go to your VPC dashboard and click on NAT gateways, then create NAT gateway. To better secure you environment its best to have separate subnets for public and private endpoints. Your NAT gateway will sit in the public subnet and you will create routes that will route private traffic to the NAT device in the Public Subnet for internet access.
NAT Instances
Although NAT gateways provide better resiliency ill explain NAT instances as well. A NAT instance is just a normal EC2 instance that uses a preconfigured Linux AMI. NAT instances do not scale to accommodate increased bandwidth. Its important that you select an appropriate instance before starting or you will have to manually increase the size as you grow, creating downtime possibly.
With the added setup needed such as having to manually manage the growth of the NAT instance, most organizations will benefit just using a NAT gateway which has built in scalability and resiliency.
VPC Peering
As we come to the close of this tutorial on how to create a virtual private cloud, we can talk about a setup some organizations or users may use. Sometimes you may want to configure instances in one VPC to talk other VPCs over the private AWS network. To enable vpc peering you must setup a point to point connection between the two VPCs from the VPC dashboard under.
To use VPC Peering you must create new routes in both VPCs to allow traffic to travel in both directions. VPC peering should only be used when you connecting a small amount of VPCs together. When you start to grow to large numbers of VPC peering connections the complexity can start become cumbersome and that is when you would want to look into using Transit Gateways. I will make another topic on Transit Gateways and the benefits they bring outside of using VPC Peering connections.
Virtual Private Cloud Summary
Building a Virtual Private Cloud provides the foundation for businesses and end users to use EC2 and other Amazon Services. To recap over everything we talked about, in each region of AWS amazon automatically provides a default VPC with default subnets, a main route table, a default security group, and a default NACL.
Many organizations use a default VPC for a while without ever configuring which makes it all the more important that you as an AWS architect understand how to make one from scratch in the event you ever need to troubleshoot what’s going on. Here are a couple steps to remember when configuring your VPC:
- Begin by defining a IP address range for the VPC and representing it as a CIDR taking into account and on premises or branch networks.
- The primary CIDR should be large enough to accommodate all of your instances, but small enough for possible other subnets
- Make sure to create subnets in different availability zones and choose the best zones because once you select a zone you cannot change it
- Before Creating instances, you need to make sure you create the security zones and proper rules you will need for access to those instances
- Every Network interface must have at least one security group attached to it.
- To allow instances to access the internet you need to create a Internet Gateway and assign a default route to the Gateway
- If you choose to use a NAT gateway you will need to modify route tables and subnets to properly secure your instances from the internet.
I hope this guide provided you with some in depth knowledge on building your own VPC from scratch and managing a more secure environment. Make sure to check out how to properly secure you EC2 instances by viewing our blog post here