This document describes how to configure a site-to-site VPN tunnel between two Cisco Adaptive Security Appliances (ASAs) using Internet Key Exchange (IKE) version 1. IKE version 1 although has a version 2 alternative that can provide some added benifits, IKEv1 has been known to work better on Cisco ASAs when connecting to other vendor products.
Steps needed for VPN Configuration
- 2 cisco ASA
- Cisco Router
- 2 virtual pcs
- First we will setup Ip Addresses on all the interfaces
- Site A: 192.168.1.0/24
- Site B: 192.168.2.0/24
- External Site A Subnet: 192.168.3.0/24
- External Site B Subnet: 192.168.4.0/24
- Then we will configure the following on each ASA
- Network Objects for each network
- ACL for interesting Traffic
- IKEv1 preshared key & phase 1 policy
- Phase 2 crypto map
- Nat Exemption rule
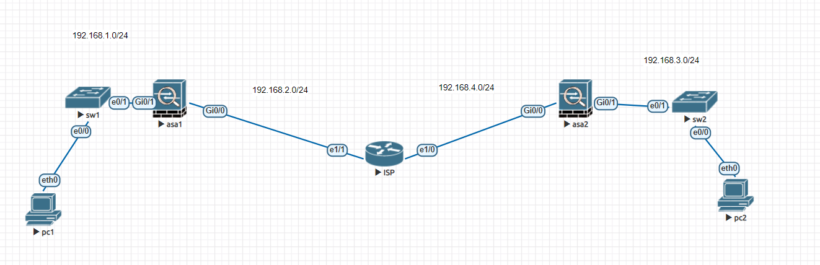
Network Diagram Setup
We will begin with setting up the network topology as indicated above. In this topology we have 2 cisco asa’s, 1 router acting as the isp and 2 switches on both sides of the network connecting to the end user devices. This setup was configured using EVE-NG technology.
For the ISP router in the middle of the diagram we will configure e1/1 with the ip address 192.168.2.1 and the e1/0 with the ip address 192.168.4.1

This is the only configuration needed on the isp router. We dont need to setup any static routes or anything since the asa’s will already be connected and it will know the routers to each side.
Next lets do some basic setup for ASA1. The basic device configuration is as follows:
- Set the outside Gi0/0 interface to 192.168.2.2/24
- ip address 192.168.2.2 255.255.255.0
- inside Gi0/1 interface to 192.168.1.1/24
- ip address 192.168.1.1 255.255.255.0
- create a static route to the outside interface of the isp
- route outside 0.0.0.0 0.0.0.0 192.168.2.1
before we get into the vpn setup lets create the same setup on our other asa2 firewall
- Set the outside Gi0/0 interface to 192.168.2.2/24
- ip address 192.168.4.2 255.255.255.0
- inside Gi0/1 interface to 192.168.1.1/24
- ip address 192.168.3.1 255.255.255.0
- create a static route to the outside interface of the isp
- route outside 0.0.0.0 0.0.0.0 192.168.4.1
VPN Phase 1 Configuration ASA1
When creating an IPSEC VPN tunnel there are 2 phases that are needed for the configuration to work correctly. Phase 1’s major goal is to establish a secure encrypted channel for the two peers to discuss Phase 2. The goal of Phase 2 talks is for the two peers to agree on a set of parameters that specify what traffic is allowed to pass through the VPN and how that data is encrypted and authenticated.
Lets first create some network objects that we will use later on:
- asa1(config)# object network site1
- asa1(config-network-object)# subnet 192.168.1.0 255.255.255.0
- asa1(config-network-object)# object network site3
- asa1(config-network-object)# subnet 192.168.3.0 255.255.255.0
Next we want to make sure that we enable IKEv1 on the outside interface
- asa1(config)# crypto ikev1 enable outside
using the network objects that we created we will need to create a network access list to permit interesting traffic from the internal network to the other:
- asa1(config)# access-list outside_cryptomap permit ip object site1 object site 3
Now we need to create a tunnel group for outside to outside connection specifying the outside ip of the other asa2 site
- asa1(config)# tunnel-group 192.168.4.2 type ipsec-l2l
- asa1(config)# tunnel-group 192.168.4.2 type ipsec-attributes
- asa1(config-tunnel-ipsec)# ikev1 pre-shared-key cisco
The ipsec-l2l is to indicate we want to create a lan 2 lan site group and the ipsec-attributes will allow us to define the pre-shared key. Although i used the password cisco, you will want to use something more secure and also this will need to match the other side of the tunnel.
Now lets finish up the phase 1 configuration by creating a crypto policy
- asa1(config)# crypto ikev1 policy 10
- asa1(config-ikev1-policy)# hash sha
- asa1(config-ikev1-policy)# authentication pre-share
- asa1(config-ikev1-policy)# group 14
- asa1(config-ikev1-policy)# lifetime 86400
- asa1(config-ikev1-policy)# encryption aes
the policy number configured above is locally significant and are checked in order from lowest to highest. Also remember to choose the best appropriate encryption, hash, lifetime value and group values that match your environments needs.
VPN Phase 2 Configuration ASA1
Now what we have phase 1 complete we can begin to move onto phase 2 which will involve making sure we encrypt the traffic that will be going over the tunnel
First lets create a tranform-set which is a set of algorithims and protocols that you set on a gateway to secure the data that will be going across the tunnel:
- asa1(config)# crypto ipsec ikev1 transform-set myset1 esp-aes-256 esp-sha-hmac
Now that we have the transform set completed, we will use that and the access-list from earlier to create a crypto map. First lets associate the crypto map with the access list:
- asa1(config)# crypto map outside_map 1 match address outside_cryptomap
then identify the peer at the other end of the connection
- asa1(config)# crypto map outside_map 1 set peer 192.168.4.2
now lets apply the transform set to the crypto map
- asa1(config)# crypto map outside_map 1 set ikev1 transform-set myset
then configure the lifetime of the ipsec security association
- asa1(config)# crypto map outside_map 1 set security-association lifetime seconds 7200
you can use pfs (perfect forward secrecy) which makes the encryption system automatically change the keys over time to decrease the chance of keys and data becoming compromised
- asa1(config)# crypto map outside_map 1 set pfs group14
then once finished with the crypto map, we will enable it on the outside interface
- asa1(config)# crypto map outside_map interface outside
The last thing that we need to do to get the first time up and running is to create a NAT exemption rule. This is to prevent the asa from changing the ip address when coming from the inside to the outside when destined to the other network.
- asa1(config)# nat (inside,outside) 1 source static site1 site1 destination static site3 site3 no-proxy-arp route-lookup
That completes the configuration for the site1 ASA. The reverse config will need to be done on the other side. To keep this document simple to read and short you can run through the exact config above and just change the ip information to match the other side.
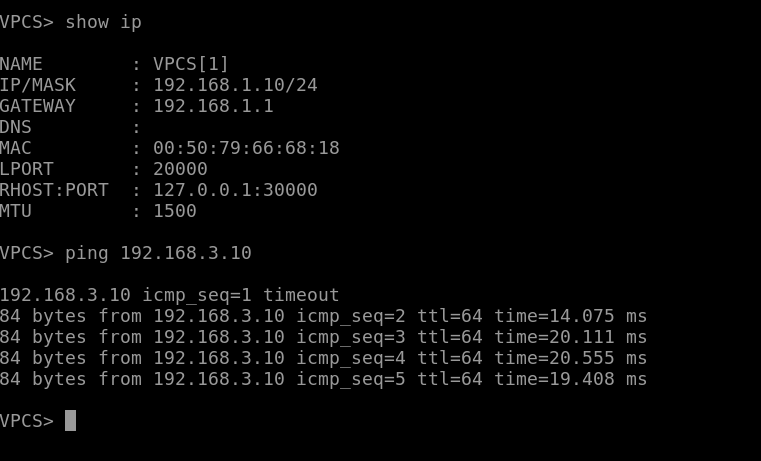
Once you have both sides done you can assign ip addresses on a host you have on one network and try and ping the other side to get the tunnel to come up. As you can see I can now ping the other network without any static route configurations inside the ISP router. Hope you were able to learn reading this lab on how to configure a Site 2 Site vpn connection between 2 networks.