Are you looking to become PCNSA (Palo Alto Networks Certified Network Security Administrator) Certified? In the course of your studies, getting your hands on real gear can be challenging. This lab walks through how to get your initial palo alto lab setup using Eve-ng.
How to setup your Palo alto eve-ng environment
Instead of documenting this process over and over follow this article to get step by step directions on how to setup a virtual lab environment. Once this is setup you can then follow along with the rest of this article to setup an online palo alto lab using eve-ng.
Palo Alto lab EVE-NG default setup
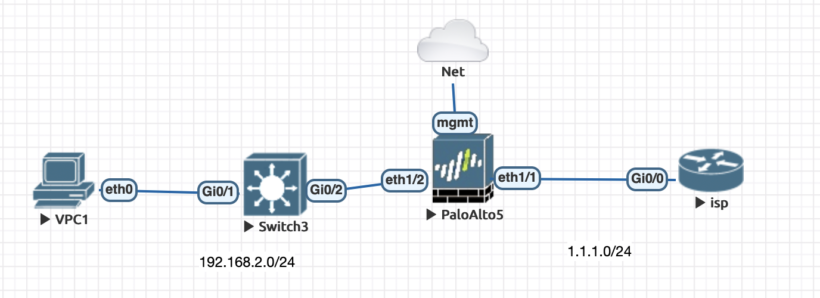
Once logged into eve-ng add a palo alto firewall, layer 2 switch and a router to simulate the isp connection. You setup could simulate this same look here below.

Eve-ng allows for you to connect your devices to your actual network to be able to manage host from your computer. Choose to add a network and choose the management cloud option and connect that to your mgmt interface on the palo alto.
This will give your palo a ip address that sits on your local network. After everything is connected power on all the devices and wait about 10 minutes. The palo alto should get an ip address and you should be able to open the gui up using that ip address. Your address will be displayed when you double click the palo alto firewall

Take the ip address and login using a browser. Once logged in we will setup a default configuration to get connectivity throughout the lab.
Default Palo Alto Lab Configuration Guide
All the steps going forward will walk through setting up sections of the palo alto firewall and what each feature has to offer.
Creating Palo Alto Security Zones
First we need to create security zones. To regulate and record the traffic that passes through particular interfaces on your network, security zones are a logical approach to group physical and virtual interfaces on the firewall.
- Navigate to Network
- Select Zones on the Left
- Create 2 layer 3 zones called “trusted-inside-zone” and “untrusted-outside-zone”
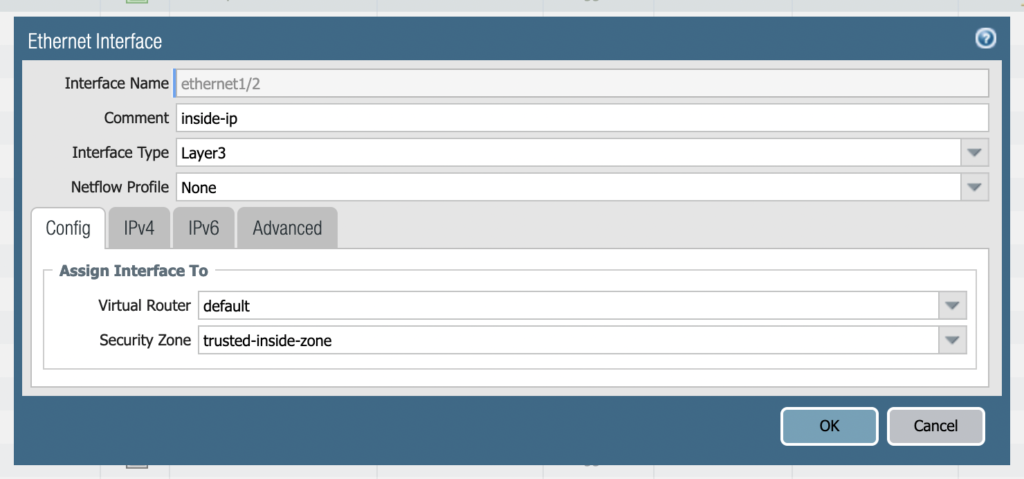
Create 2 palo alto network interfaces and assign to a zone
Now that the zones are created we need to create 2 network interfaces. Interfaces allow you to connect with other devices that go through the firewall. Select the network tab then choose the first interface. Name this interface outside-interface and set the type as layer 3.
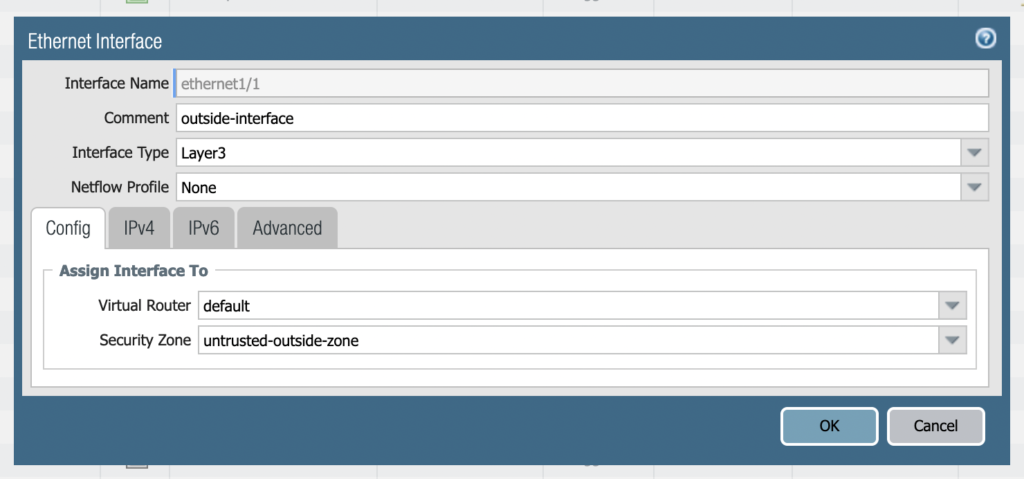
On the IPv4 tab select static. Then choose add and create a new address object. Name the object outside-ip. For the type choose “Ip netmask” and put 1.1.1.2/24.
Select the next interface and configure this one for the inside interface and zone. On the IPv4 tab select static again and give it the “IP netmask” 192.168.2.2/24.
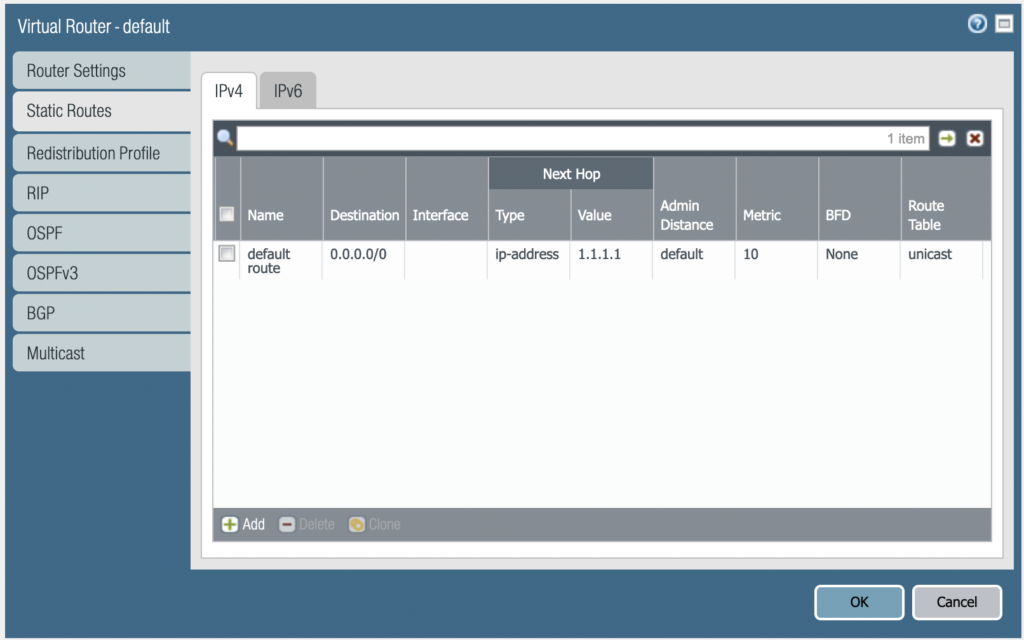
Configure Palo Alto Static Routes
In my configuration I have a isp router. This acts as the default gateway to the internet. The IP address to this is 1.1.1.1/24. We need to set a default route on the palo alto to send all internet bound traffic to the router interface.
Go to the network tab and select “Virtual Routers” and choose default. Select Static routes and select add. Input the following information from the picture below.
Now that we have the static route we need to configure a policy that allows anything from the internal zone to access the outside zone.
Create a Palo Alto security policy to allow Interzone communication
By default zones cannot communicate with each other. Select the polices tab and choose security on the left. You should see 2 default polices that you can keep. Select Add at the bottom. Apply your rules like the top line below.

Communication can now flow from the inside zone to the outside zone. In order for the devices to be able to communicate with the internet devices, we need to create a nat rule. Nat translate address from a non routeable ip address to one that can be routed over the internet.
On the same tab select Nat and apply the policy as the same specs below.

Conclusion
Now that we have full connectivity and a setup between the lan and internet routers, we should be able to test communications. From my pc I will attempt to ping 1.1.1.1 and the loopback address i setup on the router 8.8.8.8.
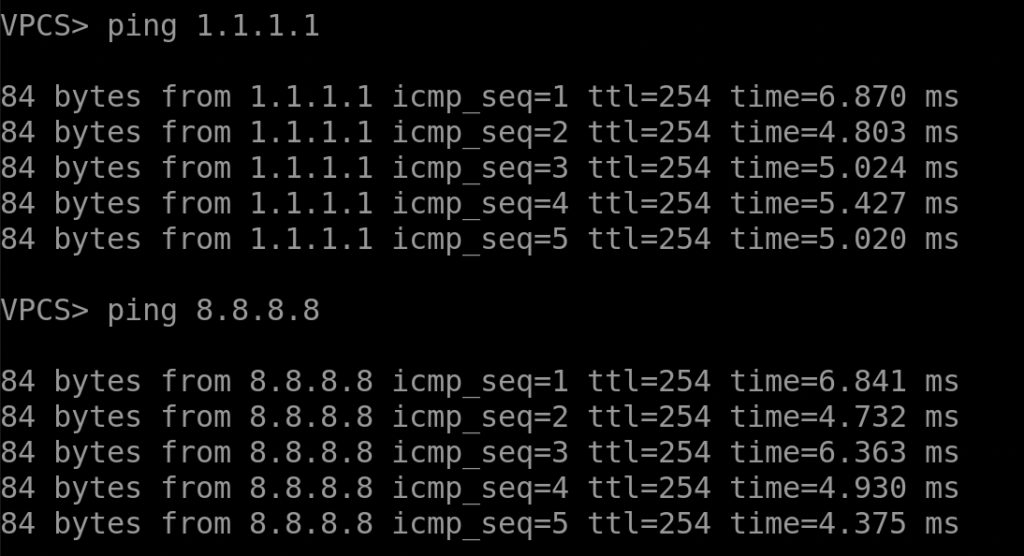
We now have full communication between the different zones and networks. You now have a fully functional online palo alto lab using eve-ng. If your new to eve-ng check out some of my other post here on various labs i was able to build with eve-ng